Quantcast
Channel: Document Management – SharePoint Maven

Why you need to be careful with the default document library on a SharePoint site

$
0
0

The default document library on a SharePoint site is like a Mother-in-Law. You cannot easily get rid of it, and if you do – you will be in big trouble! 🙂  Some time ago, I published a post on why you should avoid using the default document library for document management on a SharePoint site. This post is somewhat of a continuation of that other post. However, this time, I will tackle it from another angle and provide you with some arguments on why you need to be extra careful with this the default document library and its contents.

To refresh your memory, the original reasons for staying away from the default library were:

  1. Library URL
  2. The potential use of publishing features and impact on metadata columns
  3. File Viewer Web Part

For a detailed explanation of the above reasons, please read this post.

A few significant developments have occurred since I wrote this post in 2016.

Now, it is up to you whether or not to use the default document library on a SharePoint site due to the above arguments. You are not going to be violating any best practices or doing anything outrageous if you do this. And just for the record, I use it all the time. But, you can get yourself into some serious trouble if you start messing with it. Let me explain.

Library deletion

Good news first! You cannot delete a default document library on a site that is connected to Office 365 Groups!

default document library

That’s the good news, for us, neat freaks and OCD types! The reason you cannot delete it – a document library on a SharePoint site connected to Groups carries some serious duties:

  1. Email attachments saved from Outlook to the Group Site are stored in the Email Attachments folder auto-created in the library (designated by # 1 in the image below)default document library
  2. If you use Teams, each channel gets a folder in that same document library. So if Microsoft allowed users to delete a default library on those sites, your whole Office 365 Group and Team would become unusable. Teams Channel folders are designated by # 2 in the image above

Folder deletions in the default document library

OK, this is less dramatic, but carries some severe consequences. Because Teams creates a folder for each channel and then you also get that Emails Attachments folder too, deleting those folders, will remove the files from your channels (Files Tab in Teams) and all the email attachments you filed previously. Oops. You go ahead and explain to your boss what happened to all the files from his channel now!

File Viewer Web Part

This only applies to Communication Sites and modern sites not connected to the Office 365 Groups, since we cannot delete the default document library on an Office 365 Group site. But if you ever decide to go for it…

default document library

… then you, my friend, will run into issues with the File Viewer Web Part! When you use a File Viewer Web Part to display a document on a SharePoint page, those documents are uploaded to the default document library.

So if you delete the library, your existing file viewer web part will display a nasty message:

And if you decide to use the File Viewer Web part after you removed the default document library, you will now miss the upload button you usually have (because there is nowhere to upload to!)

The post Why you need to be careful with the default document library on a SharePoint site appeared first on SharePoint Maven.


7 ways to preview a document in SharePoint

$
0
0

As you maintain thousands of documents in SharePoint document libraries, it is inadvertent that you might open documents just for the sake of knowing what the document is all about. Would not it be nice to save some time and see the contents of a document without clicking on each one? With this post, I would like to list a few options for you to preview a document in SharePoint.

Option 1: Document Information Panel

The first option is to use the Document Information Panel that is part of every SharePoint document library and list. To access it, click on a checkbox next to a file, then little “i” in a circle, and you will now see a small window that shows you contents of the file. What is great about this option is that you can scroll through the whole document in this small window and see (if you have a sound vision) what the document is all about.

preview a document in SharePoint

By the way, you might want to reference this post for a list of file types supported for previewing files.

Option 2: Tiles View

Another option is to use the Tiles view. By default, the documents are displayed as a list in a document library. But you can also change the view to Tiles. It will then show you the small thumbnails of each file, which is essentially a snapshot (preview) of the first page of each file. Unlike the previous option, you do not need to click on each file separately, all the docs are there, in front of you.

Option 3: Preview command

Another way to preview a document in SharePoint. If you right-click on the document and choose Preview from the list of commands, it will open a document in the Preview (View Only mode).

preview a document in SharePoint

You can then edit the document if you wish or scroll through the whole thing…

Option 4: Hover over the document

I discovered this trick by accident while I was writing this post. No kidding! There is another way for you to “preview” the document in SharePoint.

  1. Hover over the document with your mouse cursor. You will get to see the text from inside of a document appearing in the pop-up!preview a document in SharePoint
  2. What’s interesting, you can “adjust” the preview text if you click the three dots (ellipsis) as shown in the image below
  3. And then once you click Edit “At a glance”
  4. …You can add or delete sections as necessary!
  5. For now, this seems to only work with Word documents only (not Excel, PowerPoint or PDFs)

Option 5: Thumbnail Column

I picked this next tip from an Office 365 consultant, James Mallalieu, who shared the trick on his Twitter account. It is pretty cool! Essentially what you can do is add a custom metadata column called Thumbnail, and it will automatically display the thumbnail image of the file. Here are the steps:

  1. From the Document Library, click Add column and choose any column type (does not matter), say Single line of text
  2. At the Column creation screen, type the word Thumbnail, then click Save
  3. Take a look at your library now. 🙂  Yeah, I know, I had the same reaction. You end up with small thumbnails of each document. It does not generate a thumbnail for Excel, but works fine with Word, PDFs, and mainly images.preview a document in SharePoint

Option 6: Dynamic Preview via File Viewer Web Part

No baby, we are not done yet. I have another neat trick for you! This one is courtesy of Lightning Tools, which is where I discovered this little hidden gem.

  1. Create a new page on your SharePoint site
  2. Break your page into two sections (columns)
  3. Add a Document Library to the left side of the screen
  4. Add File Viewer Web Part to the right side of the screen
  5. Next, on the screen that pops up asking you to embed a file to view in the File Viewer Web Part, click Cancel
  6. Click the Pencil Icon on the sidebar of a File Viewer Web Part
  7. On the pop-up on the right-hand side, click three dots (ellipsis) and then Connect to source
  8. Then, choose the document library you added to the page on the left-hand-side and click Publish to publish the page
  9. Now, as you click on a given file in the library on the left, it dynamically renders you a preview of the document on the right! Mazel Tov, we did it!

Option 7: Open a document in the browser

If you found any of the above options mentally or physically challenging, then the least you can do is click on the document. As we know it, it will open up a document for editing in the browser (by default). While this is not technically a “preview” of a document, the default browser experience allows you for a quick way to see the contents of it compared to opening the document in the desktop app (which takes way longer to do). And yes, you can save even more time opening up (previewing) the document, if you follow instructions in this blog post.

The post 7 ways to preview a document in SharePoint appeared first on SharePoint Maven.

How to make SharePoint metadata columns required

$
0
0

By now, if you have been following my posts, you probably know that I am a huge fan of metadata. One of the questions I always get is how to make sure the end-users fill out metadata columns and do not leave them blank. In other words, make SharePoint metadata columns required in a document library or a custom list. Well, in modern SharePoint, the behavior differs and depends on a few factors. Let me explain.

How to make SharePoint metadata columns required

There are two ways to make columns required in a SharePoint list or Library:

Option 1: Via Column settings

Modern list or  library interface

If you create or edit your column using the modern list or document library, you can make them required right in the column creation/edit screen.

Back-End Interface

If you use the back-end to create or edit column, here are the steps to make it required:

  1. Gear Icon > Library Settings
  2. Click on Create Column
  3. Check Yes radio button under Require that this column contains information:

Option 2: Via Content Type

If you use the Content Type functionality on your list or library, you will need to make your columns required via Content Type settings. Here is how to do this:

  1. Click on the Column Name within the Content Type
  2. Change the radio button to Required and click OK

What happens once you make SharePoint metadata columns required

Once you make the column(s) required using any of the options above, the user experience will differ based on whether you apply the column to a list or a library and whether or not you are using classic or modern experience on a document library. So let’s look into this further.

Scenario 1: Classic Document Library

If you use a classic document library (and I feel sorry for you if you still do) – this is what will happen once you upload a document:

  1. Upload a document via the Upload button
  2. You will be prompted to fill in the required metadataSharePoint metadata columns required
  3. If you decide to save the file/check-in without filling in the required columns, you will get an error message
  4. However, if you choose to press cancel, what will happen is that the document will be uploaded to the library but will be invisible/hidden to everyone else. The document will automatically become checked out until the originator fixes the incomplete metadata fields and until the document is checked back in manually!
  5. The same thing will occur if the user uploads (drags and drops) multiple documents to a document library. All of them will become automatically checked out and won’t be visible to anyone else (except for Site Admins and whoever uploaded them) until the originator (the person who uploaded them) will manually fill out all required metadata and check the documents into the library. Oy Vey!

Scenario 2: Modern Document Library

That behavior above really frustrated lots of users and led to “invisible files.” So the way a modern library treats the required columns is different.

First, if you upload a single document into the modern library, you do not have a pop-up hovering over the screen. Instead, a Document Information Panel on the right appears with a warning message, reminding you about the required fields. So it is a “soft warning.”

However, you can leave the panel completely blank and not fill out any metadata (even required ones) and the document will be visible to the rest of the users, just have the required metadata fields as blank. So required columns in a Modern Document Library are not required or enforced!

The same thing will occur if you upload or drag and drop multiple documents. All of them will get uploaded, and none will be checked out or invisible. If you go and access Document Information Panel, you once again will be reminded to fill out required metadata, but nothing will force you to do it. You can ignore the warning and go on with your day.

How to mitigate the “not required columns” when they are required

But doesn’t this mean that users will leave the required columns blank, you may ask? Yes, that’s what will happen, my friend. But, you can address this via other “softer means”:

  • User training. Explain the behavior to your end users and explain the reasons for this.
  • Required Info Warning. All the files uploaded that are missing metadata, will become highlighted in a viewSharePoint metadata columns required
  • Files that need attention view. Anytime you have a library with required columns that are missing metadata, a new view is created automatically called Files that need attention view. If you choose this view, it will filter for all the files that are missing required metadata. And it will also tell you what’s missing too.SharePoint metadata columns required

At least with this approach, all documents can be visible, and there is no “checked out documents” chaos, which will drastically reduce the number of frustrated users and unnecessary calls to the IT Helpdesk.

Scenario 3: Classic or Modern SharePoint list

Unlike document libraries, SharePoint lists honor the required columns. If the column is required on a list, you won’t be able to save an entry in the list until you fill out all the required columns. The same behavior applies to both Classic Lists and Modern lists.

SharePoint metadata columns required

Error message when creating an entry in a classic list with a required column

SharePoint metadata columns required

Error message when creating an entry in a modern list with a required column

The post How to make SharePoint metadata columns required appeared first on SharePoint Maven.

5 ways to store and reuse document templates in SharePoint

$
0
0

Document templates allow for a great way to standardize on processes within an organization.  Whether it is a Meeting Agenda template or a Budget Template or a Project Charter Template, these documents can bring consistency to a department or a project site. SharePoint, being a fantastic collaborative environment, has several different options to store and reuse document templates. Depending on how you designed your Information Architecture, you might use one method over another. Here is a summary of where you store and reuse document templates in SharePoint:

  1. Site
  2. Document Library
  3. Content Type
  4. Document Set
  5. Document Library Templates Menu

My new favorite is Option # 5 (because it is so @#$% easy), but let me also show you all the other ones we have had in SharePoint for quite some time.

1. Site

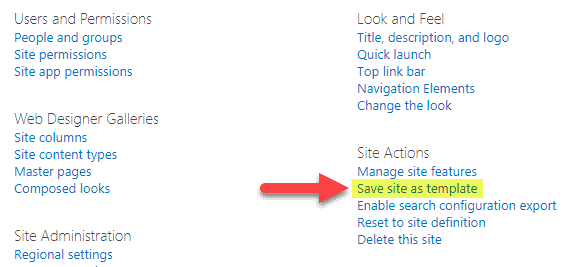
To be precise here, you can’t embed a document directly in a site. When I say that you can embed a document in a site, it has to reside within a document library (that, in turn, will reside on a site). However, by doing so, you can create a site template with the document in it. All future sites created from the site template will contain the document library with a template document in it. This technique is great if you, say, use sites for different projects and want to standardize on the use of certain documents when you create new projects (i.e., Project Charter, Agenda, Meeting Minutes, Lessons Learned, etc.). I documented all these steps here.

NOTES:

  1. Above method does not work on Communication sites or Team sites connected to an Office 365 Group.
  2. You have to be a Site Owner (Full Control) at the site level to perform the above steps

2. Document Library

Another way to replicate document templates would be to make them part of a document library. Instead of replicating a site like in step above, you would be saving a document library with documents inside as a template. The template library will then become available from the list of apps when you create a new web part/app. This technique might not be the best, since you do not want to pollute your app/web part list with all those template libraries. By the way, it is not just the libraries that you can save as templates – you can also save regular lists as templates as well using the same technique. Here is how to do this:

  1. Gear Icon > Library settings
  2. Click Save document library as template
  3. Give it a name and template name, check Include Content checkbox (to save the documents as part of the template), click OK
  4. To recreate a new library based on the template library above, click Gear Icon > Add an app
  5. Then choose the template you created in previous steps (it will appear next to all other OOTB apps)
  6. Give it a name and hit Create
  7. Mazel Tov – we are done!

NOTES:

  1. Above method does not work on Communication sites or Team sites connected to an Office 365 Group.
  2. You have to be a Site Owner (Full Control) at the site level to perform the above steps

3. Content Type

If you are into taxonomy and metadata, you probably heard about content types. One of the key features of the content type is its ability to associate a document to it. It is a 1:1 relationship. Say, you have a content type “Contract.” You can associate a company document template for contracts to this content type, such that whenever a user clicks on the New button from within a document library, he or she will be presented with a fillable Word Document, instead of the default blank word document. The template can be any file type, Word, Excel, PowerPoint, etc.

This is where you need to click to set up a custom document template

store and reuse document templates in SharePoint

This is where we associate a document template to a Content Type

And this is how it looks to the End Users when they create new files (based on a template)

4. Document Set

I blogged about a Document Set previously. Document Sets can be a great way to organize small, yet repeatable projects. Document Set, being a special Content Type, also allows storing of document templates. Just like with the site template, every time you create a new document set, document templates will be part of it. One stark and a very beneficial difference is that you can configure templates within document sets to carry a suffix of the document set name. This might be a great way to differentiate between template files and other files within a document set. For example, if you have a Budget.xlsx file as a document template within a document set, once a new document set is created, the file name will be [document set name]-Budget.xlsx. I provided instructions on how to create a document set (and set its template) here.

store and reuse document templates in SharePoint

This is where you set Document Set default content (document template)

And this is how it looks when a new document set is created
(file name prefixed with the document set name)

5. Document Library Templates Menu

There is a new way to store and reuse document templates in SharePoint which has been added to the list of features relatively recently. It is an ability to add document templates right from the front-end of a document library. This method is meant for a quick way to add templates when you do not need consistency in terms of metadata that comes with Content Types and Document Sets. Here is how to add the templates directly to the library:

  1. Click New, then +Add template at the Document Library headerstore and reuse document templates in SharePoint
  2. Next, browse to the document template on your computer to upload it, click OK
  3. Once the template is uploaded, you will see it appearing in the menu
  4. You can also use the Edit New menu option to remove other choices (to make it easier for the end-users)
  5. Uncheck or re-arrange the menu choices as necessary, then click Save
  6. So now, when users want to create a new document based on a template, they just hit a New button

NOTES:

  1. You do not need to be a Site Owner to do the above option. Anyone with Member (Edit) privileges can do this too!

The post 5 ways to store and reuse document templates in SharePoint appeared first on SharePoint Maven.

Does metadata still make sense in SharePoint Online?

$
0
0

Unlike most of my other posts, which are instructional, this one is philosophical. I am writing this post late at night while sipping a glass of red wine (because my doctor told me I should not eat just before I go to bed and I really need something to get my creative juices flowing). 🙂 Lately, I have been getting this question quite often from my loyal blog followers and clients. “Does metadata still make sense in SharePoint Online?” This is a great question, indeed and not without merit. If you have been following SharePoint Online since its inception in 2011 (when it became part of Office 365), I am sure you have noticed a slow shift from metadata back to good old folders. While I do not have any official data to back this up, I personally have seen a decline in metadata usage and user adoption among my clients. There are a few reasons due to which I can attribute such a trend.

Reasons for poor adoption of metadata

Modern Search

One of the reasons for the decline in metadata usage is that the modern SharePoint Search has become so remarkable! Unlike the classic search, the modern one is based on the Office Graph, which, in pure English, means that search results are based on user activities rather than a site hierarchy. Just modified that Budget document a few minutes ago? Expect it on top of the search results next time you search for a document.

Modern Search also searches a document itself, picking up essential keywords and text.

Does metadata still make sense in SharePoint Online

Microsoft Teams

Another “culprit” for the decline in metadata usage is tied to the success of Microsoft Teams. Yes, that tool that you use to chat and call your colleagues with. The primary reason is that Teams automatically creates a folder for each channel within a SharePoint Site document library tied to Teams. So if you had plans to tag your documents, you kind of need to create another document library to avoid confusion with the “channel” folders.

OneDrive Sync

Another reason for the poor adoption of metadata is because most users prefer to access the documents from their C: drive still. That means they have to rely on OneDrive sync, which does a great job syncing documents and folders, but leaves metadata behind. Whatever columns, views, filters you created in SharePoint – they all stay in SharePoint and do not carry over to C: drive view.

No way to aggregate and filter globally by metadata

Another issue that we always had with both classic and modern search is that if you have built multiple sites and document libraries with metadata in each, there was and still is no way to aggregate it all in one place and filter by metadata. You can only do this easily at the list or library level. In the past, with classic search, we could build custom searches that relied on crawled and managed properties and refinable strings, but it was a pretty technical endeavor and was not an easy task to complete.

Does metadata still make sense in SharePoint Online

Hub Sites

Another reason folders prevailed over metadata is due to flat information architecture we now enjoy and love with the release of Hub Sites. Since we no longer have a single site collection where we can build all the site columns at the root and propagate down to subsites underneath, it became much more challenging to reuse metadata across the flat IA. Yes, you can use the legacy Content Hub, but that is a bit outdated and has limitations.

Does metadata still make sense in SharePoint Online?

So, given the above, does metadata still make sense in SharePoint Online then? In my opinion, a BIG “YES.” Here is why…

Modern filter

The modern SharePoint document library now features a beautiful filter that was not present by default in classic libraries (you had to configure it separately via metadata navigation). The new Filters Pane is there all the time, and using it is as easy as shopping online.

Modern Retention and Record Management

A massive win for metadata is also the fact that modern retention, record management, compliance labels, and sensitivity labels all rely on… metadata!

Does metadata still make sense in SharePoint Online

Modern Term Store and Terms Analytics Dashboard

It was announced at the 2019 MS Ignite (info and screenshot available towards the bottom of the article linked above) that Microsoft is rolling out a modern experience for the good old Term Store, which has not changed in ages. This will improve usability and adoption, just like the modern document library did when it was revamped from classic experience.

Project Cortex

Project Cortex, the new Office 365 service Microsoft recently announced at the 2019 MS Ignite conference will use artificial intelligence (AI) to extract structured and unstructured content, will rely on metadata and content types.

The post Does metadata still make sense in SharePoint Online? appeared first on SharePoint Maven.

5 ways to access Documents in SharePoint Online

$
0
0

When users are introduced to SharePoint Online and Office 365, one of the most frequent questions is What is the best way to access documents in SharePoint site?” That is not surprising since the SharePoint web interface is very different from the file explorer/network drive experience we had for ages. Like with many things in life, there is no right or wrong answer here. I want to take this opportunity and explain to you the various ways you can access the documents once they have been uploaded to SharePoint. Which method you choose depends on your personal preference.

Option 1: SharePoint site

The natural option is to access documents via the web interface, by going directly to a SharePoint site. You might use that option if you have an Intranet hub built with navigation that allows you access and navigate around all the sites created in your environment.

This option is best when:

  • You have other web parts/elements on a SharePoint site
  • When you have metadata and need to sort/group/filter the documents
  • You have workflows you need to start from the SharePoint site

access Documents in SharePoint

Option 2: MS Teams

If your preferred method of collaboration is Microsoft Teams, then you might not go to the site directly at all. Instead, you can access the document library via the Files Tab in a MS Team channel. If you do have other elements/libraries on a site, you can link them up as tabs from Team channels as well.

This option is best when:

  • Your primary way of communication is MS Teams
  • You do not have many other elements or web parts to access on a SharePoint site

access Documents in SharePoint

Option 3: Windows Explorer (via OneDrive sync)

You can also access documents just by synchronizing them to your computer via OneDrive sync. This will allow you to access your documents in a very familiar interface (via Windows Explorer).

This option is best when:

  • You work a lot with documents and need to navigate and reorganize them via Windows Explorer interface
  • When you need to access documents offline (without an internet connection)
  • When you do not have metadata in your document library (since the custom metadata/columns do not copy over to a computer)

access Documents in SharePoint

Option 4: OneDrive for Business

You can also access all the documents stored on SharePoint sites via your OneDrive for Business web interface. While primarily OneDrive is used as a personal file storage space in the cloud, it also allows users to access Shared Libraries (which in pure English means document libraries on SharePoint sites). I documented this feature in this blog post.

This option is best when:

  • You are comfortable working out of your OneDrive
  • Do not need to access any other elements/web parts stored on a SharePoint site

Option 5: Mobile

Lastly, if you are mostly working from the field, you might need to access files and folders via mobile apps. In this case, you will need OneDrive and SharePoint apps so you can take advantage of not just documents but also other elements of the site.

This option is best when:

  • You work in the field and require access via mobile devices

So, at the end of the day, does not matter which method you choose – whether you access files from the computer or MS Teams – the result is the same as the true, Master copy of the file resides in a SharePoint site.

The post 5 ways to access Documents in SharePoint Online appeared first on SharePoint Maven.

Why you no longer need to worry about file naming convention in SharePoint

$
0
0

Those who follow my blogs closely might tell me, after reading the title of the post: “Greg, hold on a second, didn’t you tell us the opposite on July 21, 2016.Yes, I did. But, that was four years ago, which in SharePoint Online/Office 365 terms is like an eternity, considering how fast things change in SharePoint these days. As the great Stephen Hawking once said: “Intelligence is the ability to adapt to change.” File naming convention in SharePoint is no exception, and to march in sync with the technology, we must adapt the new rules of the land. So with this post, I would like to provide the reasons for the latest best practice and provide the arguments on why file naming convention in SharePoint no longer makes sense.

With that being said, the specific issue described in that 2016 article still exists if you use metadata in a document library and some sort of naming convention is necessary for that specific use case. However, this new article highlights the reasons on why the naming convention in general in SharePoint is not necessary.

Reason 1: You can’t enforce the naming convention

Here is a good one for you. You can’t enforce a naming convention in SharePoint. At least out of the box. Yeah, you might create some custom add-on, but that would be weird, considering the many points of entry for a user. Other than that, you might have some policies and documents in place spelling out the naming convention users must adhere to, but nothing will force them to stick to it.

Reason 2: Metadata

If you want to institute some naming convention – why not use metadata? This will allow you to assign tags to the file without burying this information in the file name. For example, instead of MeetingNotes_Project-ABC_20191230.docx file, you can create three metadata columns: Project Name (drop-down), Document Type (drop-down), Meeting Date (Date field). Then you can name your file whatever you want, and you can also filter and group by any of the properties above.

file naming convention in SharePoint

Reason 3: Modern Search

Another reason for saying “NO” to the naming convention is modern search. It got much more relevant and precise now. In addition to the file name and metadata columns, the modern search also searches for content (text/keywords) within a file, producing more relevant results.

file naming convention in SharePoint

Reason 4: Flat Information Architecture

Another reason for loose naming convention philosophy is the flat Information Architecture we now enjoy in SharePoint Online. The times of a single site collection where you could enforce some rules and guidelines are over. We now have tens, hundreds, or thousands of Team Site and Communication Sites floating around with users accessing them from SharePoint sites, MS Teams, OneDrive, Windows Explorer, and mobile devices.

Reason 5: Illegal characters

In the past, many special characters were not allowed in SharePoint. Having a naming convention helped get past this. Again, this is just another thing that got improved, and there are only a few illegal characters that are not allowed – so the chances of encountering this issue are smaller now.

The post Why you no longer need to worry about file naming convention in SharePoint appeared first on SharePoint Maven.

3 ways to display Related Documents in SharePoint

$
0
0

As companies embrace the power of SharePoint document management, I see many users warming up to the idea of metadata (which brings a smile to my face as this is my favorite feature!). Metadata on documents is excellent as it allows you to add “additional information” about a file and, most importantly – give the end-user an additional ability to search for a specific document by either filtering, grouping, or sorting by a particular metadata field.

Recently I was asked to solve an interesting problem for one of my clients. They created a library of company policies which they organized nicely with metadata (Policy Owner, Expiration Date, Status, etc.). However, they also needed the ability to link some of the policies together. In other words, they wanted an ability for the user to find a given policy and then see all the related policies with a click of a button.

I am sure dedicated third-party DMS systems already might have a solution to this, but how do we tackle this in SharePoint? And you know me, I only stick to SharePoint Out of the box configuration, so what are our options? As it turns out, there are a few ways to achieve this. So let me share with you a few ways to display related documents in SharePoint as well as the pros and cons of each.

Option 1: Lookup Column

The first option is to use a Lookup Column. If you are not familiar with it, I suggest you check out this post. Instead of looking up (connecting) to columns in another library or list, the trick is to create a lookup to a column in the same document library.

related documents in SharePoint

For Lookup column to work, make sure you have a text field with a Policy title or description (you can only do a lookup against certain field types).

Pros

  • An easy way to display related documents in a SharePoint
  • You can link to multiple documents at once

Cons

  • Creates a one-way link. In other words, if you link Policy A to Policy B, it won’t create a link from Policy B to Policy A. So, if you want to do a 2-way relationship, you will need to do this manually both ways.

Option 2: Metadata identifiers

The second option is to create a brand new column with unique identifiers that will tie the documents together. It could be a category drop-down, Chapter Name or Chapter/Section Number, or some other piece of metadata. Then, you could group by this column or filter by it – thus tying related documents together. I demonstrated this principle in this post.

related documents in SharePoint

Pros

  • An easy way to display related documents in a SharePoint
  • Can tie multiple documents together

Cons

  • Might not be evident to the end-users unless you create some pre-filtered or grouped views

Option 3: Hyperlink Column

Another option to link related documents together would be to create and use a Hyperlink Column. Here is what you need to do:

  1. Create a Hyperlink column at the library level first
  2. Generate a URL to a related document by using Copy link feature (more on this feature here)
  3. Click on the type of link generated (so we can change a view/edit setting)
  4. Uncheck Allow editing checkbox (so we prevent users from the inadvertent editing of files). Click Apply
  5. Copy the URL
  6. Edit the properties of another document and paste the URL from above into a respective metadata fieldrelated documents in SharePoint
  7. This is how it will all look to the end-user. Clicking on the related document link opens up a document in the browser in another tab

Pros

  • An easy way to display related documents in a SharePoint

Cons

  • Creates a one-way link. In other words, if you link Policy A to Policy B, it won’t create a link from Policy B to Policy A. So, if you want to do a 2-way relationship, you will need to do this manually both ways.

The post 3 ways to display Related Documents in SharePoint appeared first on SharePoint Maven.


How to restore a Document Library in SharePoint Online

$
0
0

“Oops, I did it again”. This song from Britney Spears comes to my mind every time someone messes up a SharePoint document library. Unfortunately, this happens way too often. Someone deletes a bunch of files or moves them somewhere, or the files get encrypted with some sort of virus. Whatever the reason is – you might need to clean up the mess every once in a while. Luckily for us, Microsoft has recently implemented a Library restore feature, which allows restoring the library and its contents to a previous date. With this post, I would like to explain how to restore a Document Library in SharePoint Online.

What is Restore this library feature?

Restore a library is a feature on the SharePoint site that allows the site owners to restore the library to a previous date (called a restore point). It is almost like a rewind (time machine), where it reinstates the document library to an earlier state.

Restore this library vs. Recycle Bin

I covered Recycle Bin quite extensively previously. Recycle Bin is meant for occasional deletions and allows users to restore individual files and folders. Restore a library restores the whole library to a previous state with whatever content and changes the library had at that point of time.

How to restore a Document Library in SharePoint Online?

  1. Click Gear Icon > Restore this libraryrestore a Document Library in SharePoint Online
  2. On the next screen, you can choose one of the default restore points. I prefer Custom date and time, so I can specify precisely the date and time I want to restore.
  3. On the next screen, you will get to see a slider – this is where you choose a restore point. You can only go back 30 days. Bars designate the level of activity on a given date.
  4. Below, you will see the whole activity on the dates preceding today’s’ date (shown in reverse chronological order)restore a Document Library in SharePoint Online
  5. From here, you can choose a specific date or a particular time during the date to restore. In my case, I decided to restore to a specific time of the date. All the highlighted changes after that date/time up until now (today) will be erased.restore a Document Library in SharePoint Online
  6. Once the restore point has been chosen, hit Restorerestore a Document Library in SharePoint Online
  7. You will get a warning message, hit Restore again

What happens when the Document Library is restored

  1. You will see this page appearing, advising you that the library is being restored
  2. The library goes into Read-Only mode for everyone (for obvious reasons), until the restoration process is completed
  3. After a while (depending on the volume of your library), you will get a confirmation message saying that the library has been restored
  4. You will notice added activity on the library feed as it restores/deletes/updates documents to return them all to the previous staterestore a Document Library in SharePoint Online
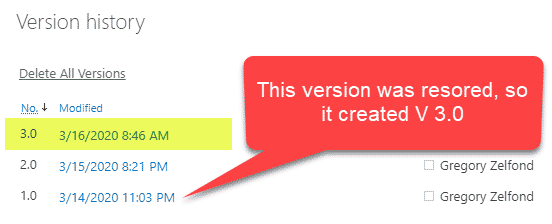
  5. A new version will be created for each document that was revised and was restored to capture the restored change.

Restore this library limitations

  • You can only restore up to 30 days compared to Recycle Bin’s 93 days
  • Restore this library feature is only accessible by Site Owners (not Site Members)
  • Check this post from Microsoft for additional tips and limitations.

The post How to restore a Document Library in SharePoint Online appeared first on SharePoint Maven.

6 ways to archive documents in SharePoint

$
0
0

It is inevitable. Despite your best efforts to keep SharePoint document library under control – it will become a monster at some point. It is like your weight. You have a plan to stay in shape, and that’s your New Year resolution and all, but in 6 months, it is time to buy new pants again because you let yourself loose and ate junk food daily while watching movies on the couch.

In SharePoint, the analogy would be the number of documents in a document library. As organizations collaborate within departments and projects, we also need an effective method to “keep the house clean” and archive docs that are important but yet, no longer required on an ongoing basis. So in this post, I would like to explain the different options we have on how to archive documents in SharePoint.

Option 1: Manual Move/Delete

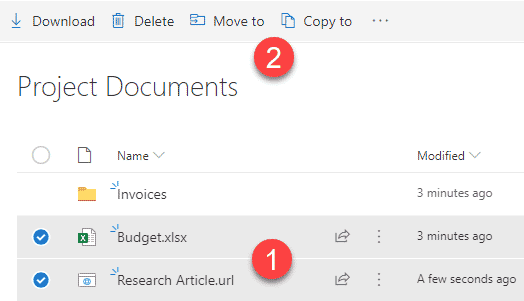
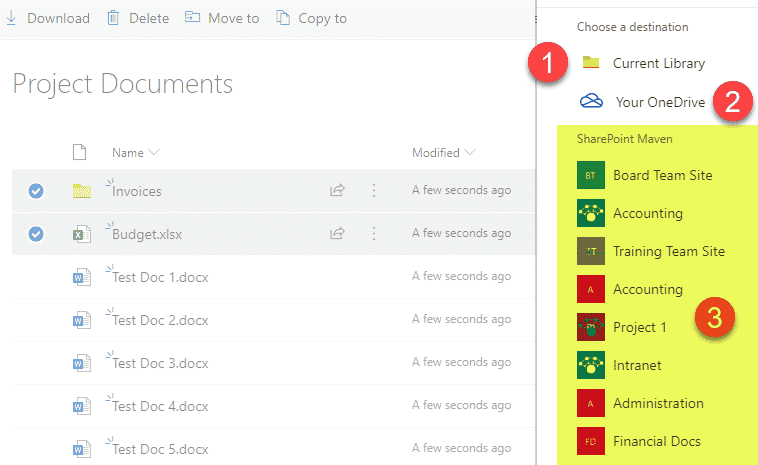
Of course, the easiest way to keep the library in control is to regularly check for outdated or irrelevant content and manually deleting or moving files and folders to a different site/library (i.e., archive document library of some sort). The new Copy/Move operation in a Modern Document Library makes it super easy.

archive documents in SharePoint

Pros

  • Nothing to set up

Cons

  • Requires manual intervention by users

Option 2: Retention policies

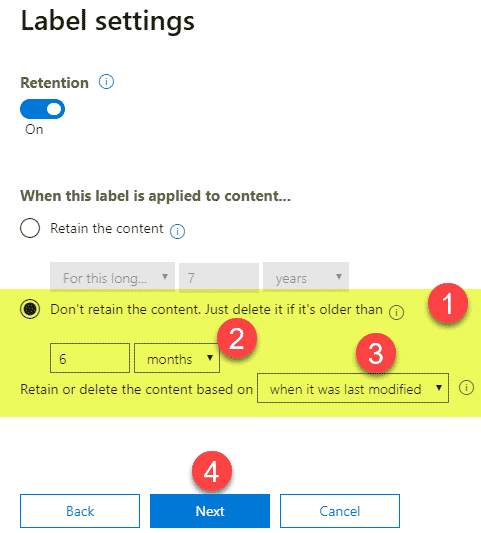
The other option to keep the document library under control would be to set up deletion retention policies based on the age of a document (i.e., last modified or created dates). You would define those in the Office 365 Compliance Center and then publish them to the respective sites. You can delete old (outdated) documents at the whole site level, library level, folder, or even file level. I documented the steps here.

To be accurate here, this is not an archival technique per se, but rather a trick to keep the library size under control, fresh and relevant as the documents of a certain age are just deleted/moved to the Recycle Bin.

Pros

  • A modern way to keep sites/libraries clean, fresh and relevant

Cons

  • Requires setup
  • Not really an archival technique as it just deletes the documents based on the age

archive documents in SharePoint

Option 3: Workflows

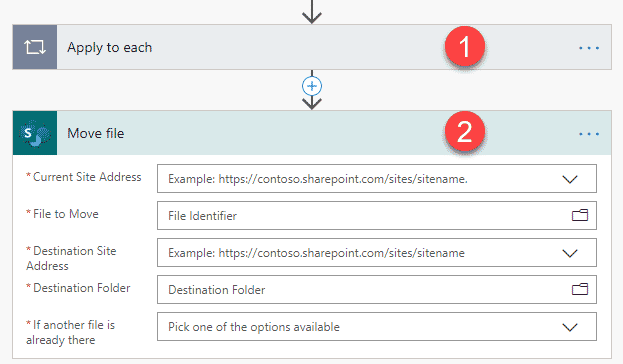
Another option to archive documents in SharePoint would be to use a workflow solution built in Power Automate. This requires a bit of sophisticated setup, so the assumption is that you are comfortable with the Power Automate application. Joanne Klein wrote a fantastic post with instructions on the topic. Please check it out here.

Pros

  • A true archival option

Cons

  • Requires considerable setup
  • Setup needs to be replicated for all libraries/sites – lots of manual configuration

archive documents in SharePoint

Option 4: Security Trimming

This method is more of a “workaround” and not a true archival technique, but I still wanted to provide this as an option as it might work in some instances.

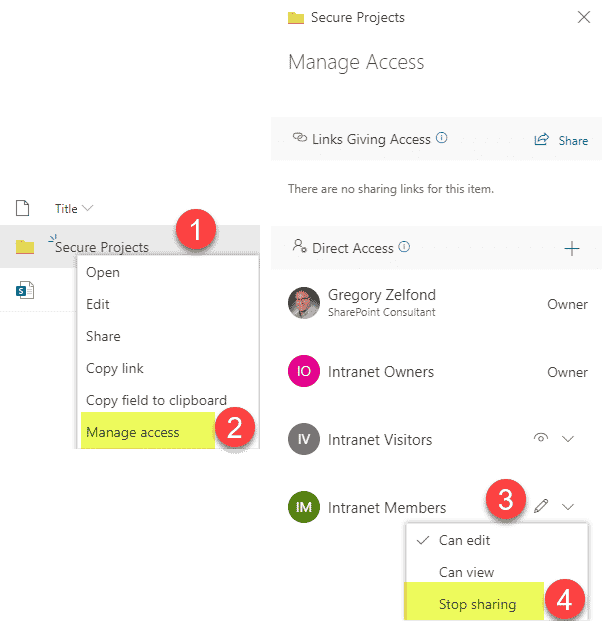
The idea behind this approach is that you would be setting up unique permissions for certain folders you need to “archive,” thus making them invisible to the end-users. So, in reality, folders will still be there, just hidden. I explained how to set unique permissions for files and folders here.

So unlike all of the options above, you won’t be physically moving content anywhere, just hiding it from the view. It is an excellent option to implement in case you need to hide stuff quickly without going through the pain of re-organizing content.

archive documents in SharePoint

Pros

  • Relatively simple to implement

Cons

  • Not really an archival technique as it just hides the documents from the view
  • Folders/Files cannot be hidden from the Site Owners/Site Collection Administrators. Only Site Members and Site Visitors

Option 5: Custom Metadata/Filtering

Another “workaround” method to “archive” documents involves metadata. Kind of similar to the trick above, but instead of hiding files and folders via security, we will hide them via custom metadata.

The idea behind this method is that you will need to create a custom metadata column on a library called “Status” (or whatever you want to call it) with a few drop-down choices (i.e., Active/Inactive). Once tagged, this will allow you to filter out (hide) the Inactive files.

Pros

  • Relatively simple to implement

Cons

  • Not really an archival technique as it just hides the documents from the view
  • Can only tag files, not folders
  • Requires consistency in tagging if you would like to utilize across multiple sites/libraries

Option 6: Content Organizer

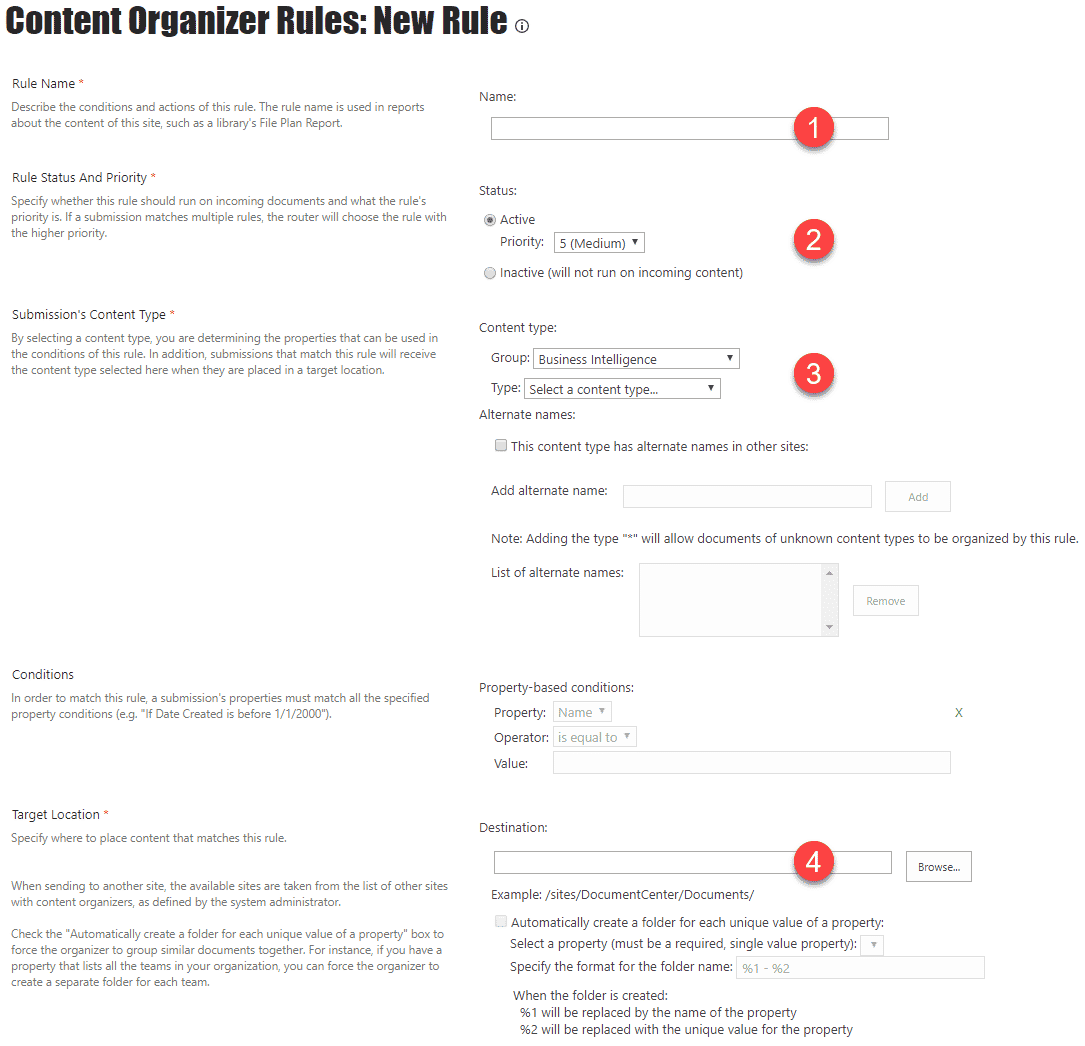
There is another option available to archive documents in SharePoint and the only real option if you are not in SharePoint Online and are still on SharePoint on-prem (older versions of SharePoint). In such cases, you would use the Content Organizer feature, which is a legacy feature that allowed us to create rules and route documents to various locations using the Content Organizer Rules. This article explains the feature further. If you are in SharePoint Online (Office 365) – it does not make much sense to use with the modern ways/options I described above.

archive documents in SharePoint

Pros

Cons

  • Requires considerable setup

I devote this post in memory of Ruth Bader Ginsburg, an American liberal icon who advocated for women’s rights and equality.

“Fight for the things that you care about. But do it in a way that will lead others to join you.”

— Ruth Bader Ginsburg, 1933 – 2020

The post 6 ways to archive documents in SharePoint appeared first on SharePoint Maven.