Quantcast
Channel: Document Management – SharePoint Maven
Viewing all 70 articles
Browse latest View live

Advantages and Limitations of using Office Online in SharePoint and OneDrive

$
0
0

Office Online in SharePointOne of the biggest draws of SharePoint Online and Office 365 is the ability to access the files anytime, anywhere. An added benefit, that in my opinion is somewhat of a revolution in collaboration world, is the ability to open and edit documents in Word, Excel and PowerPoint right in the browser. That means that you can work with those file types without having to have desktop version of MS Office installed on the computer. In this blog post I would like to explain advantages and limitations of using Office Online in SharePoint and OneDrive.


How to open and edit documents in the browser (using Office Online)

  1. To open the document in the browser, just click on any Word, Excel or PowerPoint file – by default, the file will open using Office Online (in the browser). Screenshot below shows an example of a Word document, opened in the browser, though same exact behavior applies to Excel and PowerPoint as well.officeonline1
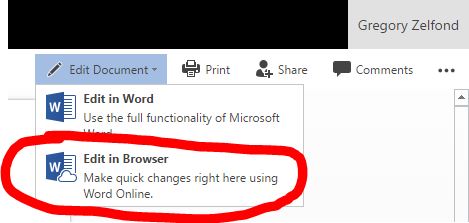
  2. To Edit the document in the browser, just click on Edit Document dropdown and choose Edit in Browser (you can also open the document in native Word application if you so desire)officeonline2
  3. Word Online edting capabilities will now be exposed and you can make changes to Word Document, just like in the installed version of the softwareofficeonline3
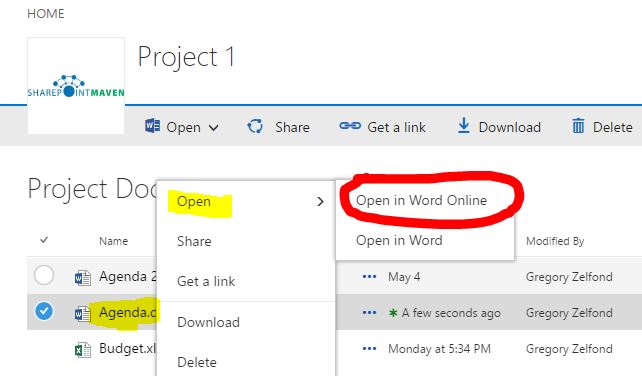
  4. Another way (shortcut) to quickly edit MS Office files is by right clicking on the file from within SharePoint and OneDrive and choosing Open > Open in Word Online from the menuofficeonline4


Advantages of opening and editing documents in the browser

  1. It is FREE. Office Online is included in all Office 365 Business/Enterprise plans and you don’t need to buy MS Office desktop license for it to work
  2. Simple sharing. It is easier to share Office Online documents as there is a Share button available in the upper right-hand cornerofficeonline5
  3. Quick Editing. Great option when you want to make quick changes to the document – files open up quicker than using installed version of the software
  4. AutoSave. Office Online does not have a Save button – all changes are autosaved. So if you make a change and then close the browser – no worries – all changes are saved automatically.
  5. Does not require MS Office to be installed on PC to work. Since Office Online does not require Word, Excel or PowerPoint to be installed on the computer – this option is great when you need to access files in SharePoint and OneDrive from computer that does not happen to have this software installed (i.e. connecting remotely from hotel’s computer)
  6. Supports PDF.  In addition to Word, Excel, PowerPoint, Office Online can also open PDF documents right in the browser. Please note that it does not support Edit capability for PDF files. For that, you would need an Adobe Acrobat software.


Limitations of opening and editing documents in the browser

  1. Only works in SharePoint and OneDrive. In order to open and edit MS Office documents in the browser (using Office Online) the documents have to reside in either SharePoint or OneDrive. They cannot reside on a computer or file share (network drive). This is by design, not so much of a limitation, but you would be surprised how many users question this.
  2. Limited functionality. Word Online, Excel Online and PowerPoint Online are not fully-installed applications on your PC. They are stripped-down (lite) versions of the corresponding desktop applications and do not have the full functionality you have on your PC. As such, they are meant for “lite” editing, and are not meant as a replacement for the desktop software.
  3. Limited file support. Office Online only works with the following file formats: .docx, .xlsx, .pptx files and PDF. Note the “x” at the end of MS Office file extensions. That means only latest MS Office files are supported (see next limitation).officeonline7
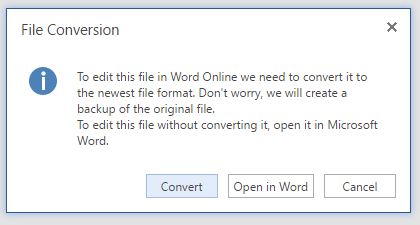
  4. Requires conversion for older MS Office files. Related to the point above – if your Word, Excel, PowerPoint files have been saved using older versions of the software (i.e. Word 97 or Excel 2003), they need to be saved (converted) to the new file format (from .doc to .docx). If you try to edit older version of the file in the browser, you will get a conversion request message (once you click Convert, the file will be converted to the new file format on the fly (from .doc to .docx)officeonline6
  5. Does not support CSV files. In case you need to edit CSV (comma delimited or comma-separated values) file, you will need to use the desktop version of Excel. CSV files cannot be viewed or edited in Office online
  6. Does not support password-protected files. If your file has been encrypted (saved) with the password, Office Online will prompt you to open it using desktop version of the applicationofficeonline8
  7. File Size Limitation. If you have large files (>10MB in size), you will be prompted to open the file in the native (desktop version) of the Office. For example, below is a message you get when you try to open an Excel workbook larger than 10MB in size. Here is a Microsfot article that talks about this limitation further.Excel Online Error Message
  8. Certain SmartArt shapes are not supported. If you are using SmartArt shapes to draw charts and diagrams in your Word, Excel or PowerPoint, please note that some shapes are not supported. If Office Online runs into the issue – it will prompt you to open the file in native (desktop) version of the applicationofficeonline9officeonline10
  9. Can’t run macros in Office Online. You can still access the documents with macros using Office Online, but to run macros, you will need the desktop version of the applications
  10. More limitations exist. For complete list of features that are not supported in Office Online, reference this comparison chart, courtesy of Microsoft.


How to disable Office Online (ability to open and edit Word, Excel, PowerPoint in the browser)

The default behavior for opening Office files in SharePoint when you click on them is via Office Online (via browser) and not via the native, desktop application. You can change that behavior though, if you wish.


Option 1: Disable Office Online (Browser Mode) for a Document Library

  1. Go to the library where you want to change the browser behavior. Click on Gear Icon > Library Settingsofficeonline11
  2. Choose Advanced Settingsofficeonline12
  3. Under Opening Documents in the Browser, choose Open in the client application button. Click OKofficeonline13


Option 2: Disable Office Online (Browser Mode) globally

  1. Go the root of the site collection (the very top site)
  2. Go to Gear Icon > Site Settingsofficeonline14
  3. Under Site Collection Administration, choose Site collection featuresofficeonline15
  4. Scroll down to Open Documents in Client Applications by Default. Click on Activate. Please note that this will alter the behavior for the whole site collection (all document libraries) at once.officeonline16
  5. If you have multiple site collections in your environment, you will need to repeat above steps for all of them

Though I have provided above instructions for your reference, I strongly discourage you from implementing them. Office Online provides a great, modern and convenient way to work with the files and you should really embrace it and take advantage of it and not revert to the way you worked with the documents in 1990’s.


In Summary (Fine Print)

Ability to open and edit Office documents in the browser (via Word Online, Excel Online and PowerPoint Online) provides an awesome value and an additional mode for collaboration to SharePoint and OneDrive users.

One important thing to note is that…

Office Online is not a replacement for desktop Office applications, like Word, Excel and PowerPoint.

Office Online is meant to be complimentary to desktop software, not a an alternative or a complete replacement. If you are trying to save on licenses, please don’t do it. You will not be able to get by on browser versions of the software alone due to many limitations listed above. I worked with several clients who migrated to SharePoint Online and thought they could save few bucks by purchasing cheaper licenses that did not include Office desktop suite and let’s just say I could be rich if I made bets with them at the beginning of the project.

The post Advantages and Limitations of using Office Online in SharePoint and OneDrive appeared first on SharePoint Maven.

SharePoint Document Library – one or many?

$
0
0

sharepoint document libraryShall I put all my documents in one library or multiple libraries? This is the question that always comes up when it is time to create the sites and migrate your documents from file shares / network drives to SharePoint. With this post I hope to answer that question and explain pros and cons of single vs. multiple document libraries concept.


SharePoint Document Library – one or many?

To start off, if you are moving from network drives / folder structures to SharePoint, you will never want to put all of your files and folders in one big SharePoint document library. As I stated numerous times in my previous blog posts, the best practice is to break up that content and place it into different sites, depending on the business function/intent and unique security of the site. For example, all the HR documents will go to HR site, all Finance documents to Finance site, all Project documents to Project/Team Site and so on.

Assuming you did this, here is a next dilemma you might face. Say, each of your Departments has its own set of policies/forms/ templates they use. And you want all of these policies to be available in one spot. How do you deal with this? Well, there are 2 options available to you. Let me explain both.


Option 1: Each Department stores their policies, forms or templates on their respective sites

The obvious option would be to let each department manage and store their own policies, forms or templates. However, by doing so, you are making the task of aggregating these various documents in 1 place a very complicated one. Yes, it is possible to roll up the documents from multiple libraries and sites into single site/location, however, not something that can be done straight out of the box – it does require you to use advanced SharePoint Web Parts like CQWP (Content Query Web Part or CSWP (Content Search Web Part) and you need above an average Power User /Administrator knowledge of SharePoint to achieve this. And the rolled up content will look like this…

CSWP Search Results

To put in simple terms, there is no Out of the Box way to roll up content from multiple document libraries into another document library.

Moreover, because of the decentralized nature of this (every department is on their own), you might not have a good mechanism or governance to standardize on naming conventions, metadata tagging of those policies.


Option 2: All departments store their policies in one library / site

The second option would be to provision 1 site dedicated to Policies. On that site, you can create a single document library, configure metadata with properties that are relevant to Policies. Examples of such metadata would be:

  • Policy Owner (example: list of Departments like Accounting, HR, IT)
  • Policy Audience (example: Department names, types of employees like Full-time, Part-Time, Contractor)
  • Policy Type (example: policy, guideline, procedure)
  • Policy Status (example: draft, approved)
  • Policy Expiration Date

Here is an example of what such library might look like when all is set and done

Document Library Metadata Navigation

All you need to make sure is that policy owners from each respective Department have Contribute Access to this site/library and are properly trained on the new business process.


I always advocate Option # 2 to my clients. Here is why:

  1. It is all about End Users! When you have all your policies in a single document library – you are making it super-convenient for your end users (Content Consumers) to find stuff. All they have to do is navigate to the site or library and it is all there for them. When you have content spread out in multiple sites, you are making it easier for content owners, but not content consumers. If you were an End User, would you prefer going to 1 place to find all your company policies or multiple? It is like one-stop-shop!
  2. Standard categorization. Since all of the files are in single document library and not spread over multiple site/document libraries, it is much easier to come up with uniform categorization (metadata) for all the policies. And there is only one document library that you need to setup, not many!
  3. Advanced filtering criteria. Since all polices are organized in single document library and you did your homework with metadata, finding stuff based on metadata is super easy! You can use various view, filters to group, sort your policies any way you want. Or you can enable metadata navigation to provide user with nice-looking filter to search for documents. You just won’t get the same nice look and feel and interface when you are rolling up content from multiple sites.
  4. No need to roll up content or write complicated search queries. If you have your policies on multiple sites and libraries, I hope you are an advanced power user or SharePoint Administrator with intimate knowledge of how search works and ability to write queries using CSWP web part.

With that being said, there are obviously situations when you cannot and should not put all your documents in one library. Project files are a good example. Project files will sit in each and separate project or team site and in case you want to roll up or aggregate documents from multiple project sites – you will be forced to use search queries mentioned above. However, for certain types of content, just like the one mentioned above, just by making slight changes in your business process, you can easily standardize on your documents, easily create nice search experience for your end users (content consumers) and alleviate yourself from major effort and overhead associated with writing queries and setting up custom searches in SharePoint.


Need help with SharePoint?

Gregory Zelfond_sAs an independent SharePoint & Office 365 Consultant and certified Project Management Professional (PMP), I help businesses and non-profits to unlock the power of SharePoint so they can improve the bottom-line business results.

My code-free, out-of-the-box SharePoint solutions include: SharePoint Migration, Document Management and Training to businesses and non-profits. As an independent consultant who works virtually and remotely, my services cost a fraction of what you typically would pay SharePoint consulting firms.

Contact me at greg@sharepointmaven.com if you need help with SharePoint in your organization.

The post SharePoint Document Library – one or many? appeared first on SharePoint Maven.
2 ways to restore OneDrive for Business files from the Recycle Bin

$
0
0

restore OneDrive for Business filesWith SharePoint, you never stop learning! I learn something new every single day. I wish I had all the time to share all the cool little tricks with you. But I am super excited to share this little trick I learned just recently. It is on a very exciting topic of Recycle Bins. To be precise, on how to restore OneDrive for Business files from the Recycle Bin. I never thought trash would get so much attention! I learned the trick from SharePoint guru, Mike Smith. He mentioned it in response to my other post on SharePoint Recycle Bin. And while SharePoint Recycle Bin works very similarly to OneDrive Recycle Bin, there is one cool thing that is different. Let me explain.


How to restore OneDrive for Business files

Option 1: Restore OneDrive for Business files from Online Recycle Bin

Essentially this is the same technique I described in my previous post. You can restore your deleted OneDrive files same way you would restore SharePoint files:

  1. Click on Recycle Binrestorerecyclebin1
  2. Choose the file(s) or folder(s) you need to restore, then click Restore Selectionrestorerecyclebin2


Option 2: Restore OneDrive for Business files from your computer’s Recycle Bin

This is the trick I learned from Mike Smith. If you are using OneDrive for Business sync client, you can also go to your computer’s Recycle Bin and restore files from there as well. So it is just like restoring your regular computer files!

  1. Click on Recycle Bin on your computer desktoprestorerecyclebin3
  2. Restore files from the computer’s Recycle Bin by dragging them out of the Recycle Bin or by right-clicking on the files and choosing Restorerestorerecyclebin4


Couple of very important notes related to that second option

  1. You have to sync your OneDrive for Business to your desktop (if you don’t sync files using OneDrive for Business Client, this technique won’t work)
  2. You have to use the New Generation Sync Client for this to work. If you are using an old generation client, this will not work. Moreover, this trick does not work with SharePoint just yet (since it uses an old sync client for now). I expect the same functionality for SharePoint as well down the road
  3. Deleted folders do not end up in the Computer Recycle Bin, just the files. So if you delete a folder with the files inside, the files will end up in both “online” and computer Recycle Bins (and can be restored from either location). Folder by itself will only end up in “online” Recycle Bin (from where it can be restored).

Hope you learned something new! And thank you, Mike Smith for sharing this awesome tip with the community!

The post 2 ways to restore OneDrive for Business files from the Recycle Bin appeared first on SharePoint Maven.

5 ways the new Document Library in SharePoint will improve your collaboration

$
0
0

Document LibraryThe new document library experience has been a welcome change in the SharePoint Online world. While the back-end (administrative) side of things did not really change, the new document library got a major face uplift as well as a number of end-user improvements. It now looks a lot like OneDrive, with an intuitive interface and it is much easier to navigate than before. Below I would like to highlight, what are, in my opinion, some of the best end user improvements and features.


newdocumentlibrary1newdocumentlibrary2a


“Classical” library                                                                     Same library in the “New Experience”


1. Ability to upload and drag and drop folders

In the old document library, if you wanted to upload a folder, you had to use Open with Explorer feature and move files and folders just like you did in Windows. You physically were prevented from uploading folders or dragging and dropping them into the library. Every time you tried to do that – you would see below error message.

newdocumentlibrary3

Not anymore. In the new document library, you can upload folders using the upload button or you can just drag and drop them into the browser window. This is an extremely useful and time-saving feature.

newdocumentlibrary4


2. Ability to pin documents

Do you feel like your proposal or agenda document is the most important document in the library and everyone should see it first when they access that library? You are in luck! In the old days, you had to be creative with your folder names to make them stand out. With the new document library – all you have to do is pin it. By the way, you can pin files and complete folders too!

newdocumentlibrary6

When you pin a file or folder, it appears as a tile above the rest of the documents in the library. You really can’t miss it!

newdocumentlibrary5


3. Full path breadcrumb

You will love this one! This was the biggest complaint of the “classical” document library. You now can see the full folder path of the file within the document library. The old (classical) library only displayed the last 2 folders in the path. That has been fixed and now you can see all the full hierarchy (folder path).

newdocumentlibrary7

By the way, the breadcrumb also applies to metadata. If you filter for certain columns in a library via metadata  – they are all displayed in a breadcrumb. Love it!

newdocumentlibrary8


4. Ability to store links

Another great feature of a document library. Say, you are storing some files related to a project or research or something, but now you also have some websites you need to bookmark that are kind of related to the document. Or there is another related document that happens to reside in a different site/library. You are in luck! In the new document library, in addition to files, you can store… links. To do that, just click on New > Link and provide the URL and the name for your link. By the way, if you are into links, there are 8 ways to store links in SharePoint. Check this post to learn more.

newdocumentlibrary9


newdocumentlibrary10


5. No more lost documents when metadata is missing

In the old document library, if you made some metadata columns required and then the user uploaded the doc but failed to fill in metadata – the document would get lost. What happened, in reality, is that those files would be automatically checked out to the user and would stay invisible to other users until the metadata is filled in and until the files are checked back into the library. That often led to lots of confusion, unnecessary calls to Helpdesk, etc.

newdocumentlibrary11

The new document library in SharePoint behaves differently. If the columns are marked as required, the system would still accept the files without metadata and they would be visible to everyone (just will have empty metadata columns). However, when users hit the Information panel (Details) – they would be prompted to enter metadata. They can still leave the required fields blank – so in other words, the metadata cannot be really enforced like it was in the old library.

newdocumentlibrary12


The post 5 ways the new Document Library in SharePoint will improve your collaboration appeared first on SharePoint Maven.

Document sets – the hidden gem of SharePoint

$
0
0

The classical joke in SharePoint is that the debate over folder vs. metadata never ends and will probably never end. Some users prefer metadata, while others are stuck with good-old folders. However, there is one type of functionality that allows the flexibility of both. Today, I want to introduce you to the functionality of Document Sets, the magic feature that allows you to store documents in folders, yet, assign metadata if you wish.

What is a Document Set?

Document Set is a special Content Type. In the past, I have written few blog posts on content types and how to use them. Check out this post to learn more about what the Content Type is this one about how to use them with documents and document libraries.

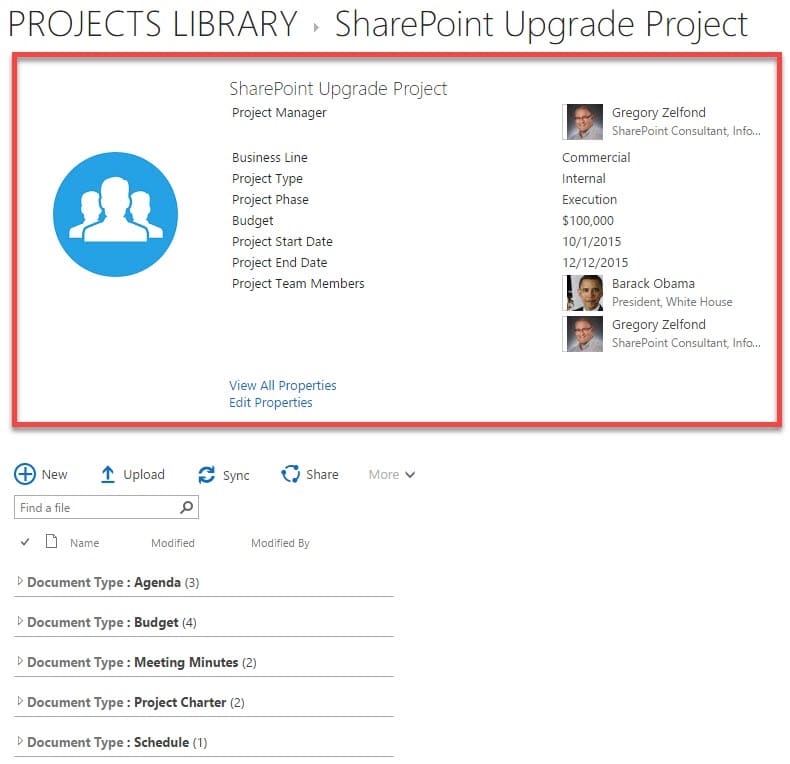
To explain in basic terms, Document Set is a folder with metadata. And I am not joking when I say it is a folder. As I will later demonstrate, when you create a document set in SharePoint, behind the scenes you actually create a regular “yellow” folder. Except, this folder can have metadata assigned to it. And the documents you put inside of that folder can also have metadata assigned to them. Awesome!

What makes Document Sets special?

In addition to being able to have metadata combined with folders, document sets have these special and unique features that make them standout from other document management methods.

Welcome Page

Each Document Set gets its own page that displays folder-level metadata and allows to access the files inside of the folder (document set)

Ability to inherit metadata

You can set the Document Set such that any files uploaded to the Document Set (folder) will inherit the metadata from that folder.

Unique permission for each document set

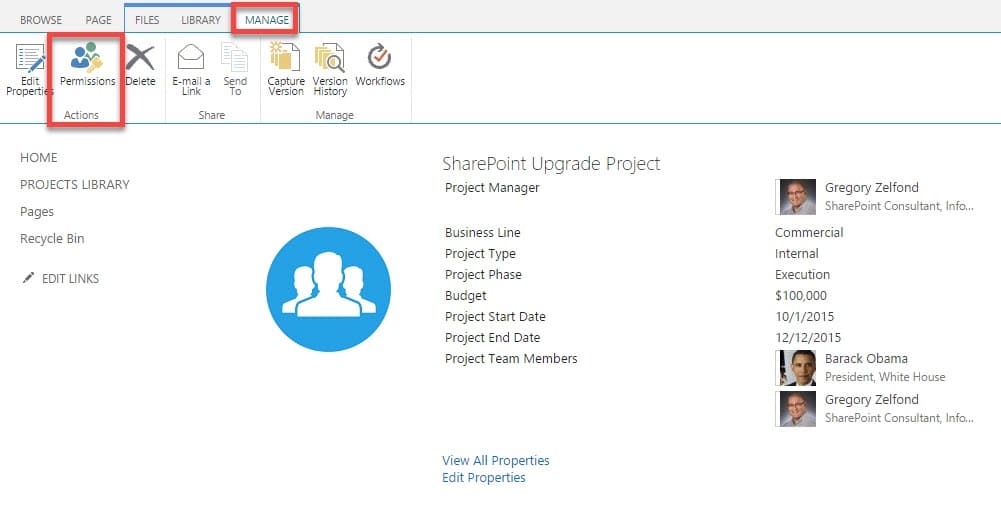
You can also assign unique permission to each document set. You can do the same with regular folders, but the user experience is much better with document sets.

Ability to search across the document sets

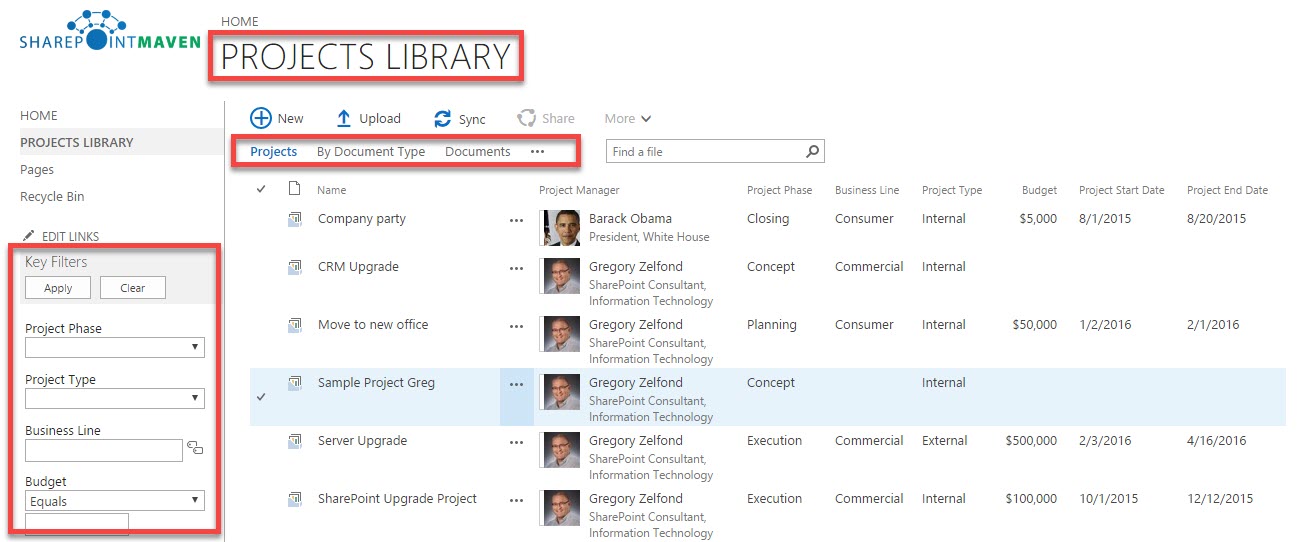
All the document sets (folders) you create reside in a single library. That means that you can easily search across document sets since you will essentially be searching in a single document library (unlike searching across multiple sites, which is a bit tricky).

How to set up a Document Set

Let’s go aherad and create a document set. For the purposes of this example, we will create document sets to store our projects (project documents).

Step 1: Crete a Document Set Content Type

Since Document Set is a special content type, first you need to create a content type – you do that at the Site level

  1. Click the Gear Icon > Site Settings
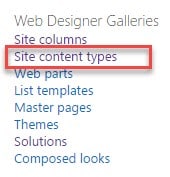
  2. Under Web Designer Galleries, choose Site content types
  3. Click Create link
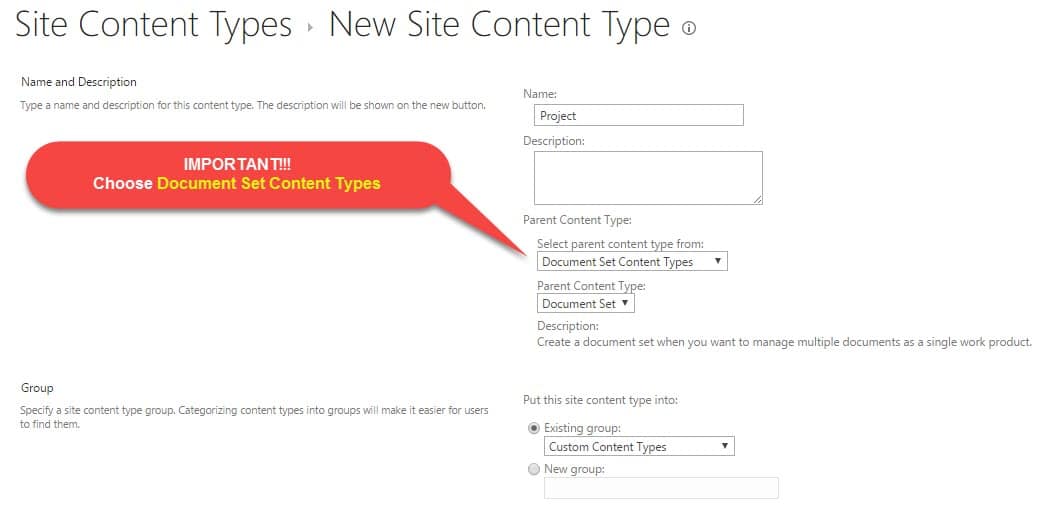
  4. On the next screen give your Document Set a name (i.e. Project), then from the Parent Content Type drop-down choose Document Set Content Types, then Document Set from the drop-down below. At the bottom of the screen, choose the group for your new content type (you can leave it in the Custom Content Types group or can create a new one).
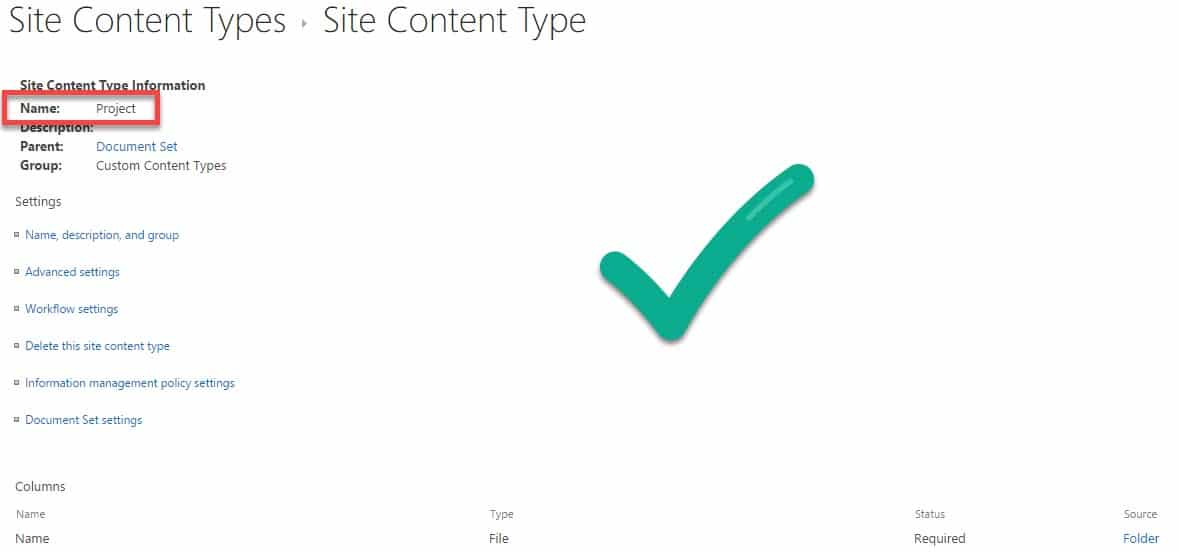
  5. Your custom Document Set Content Type is created! (but we are not done yet)

Step 2: Add content type to the document library

In this step, we are going to be adding our custom content type to the library.

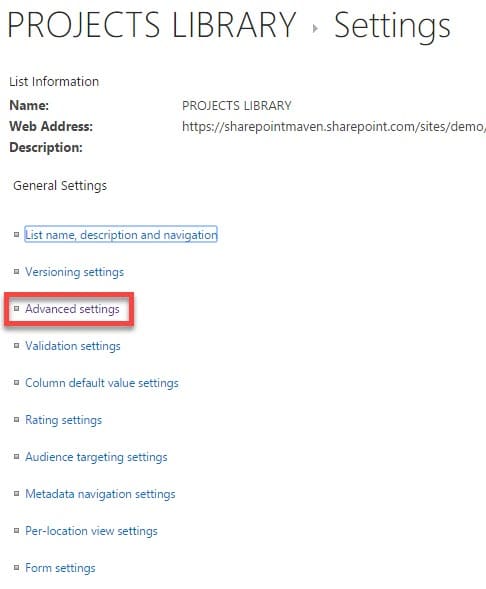
  1. First, we need to enable multiple content types for a document library. In the document library where you want to add document set to, click on Library Settings > Advanced Settings
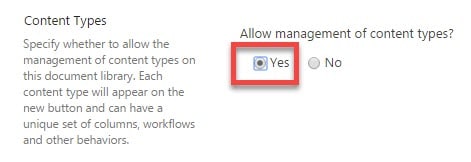
  2. Under Allow management of content types?, choose Yes. This will allow us to add custom content types. Click OK at the bottom of the screen.
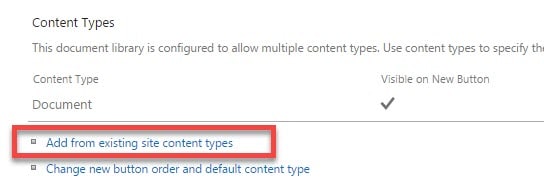
  3. In the Content Types section that appears as a result of the previous step, click Add from existing site content types
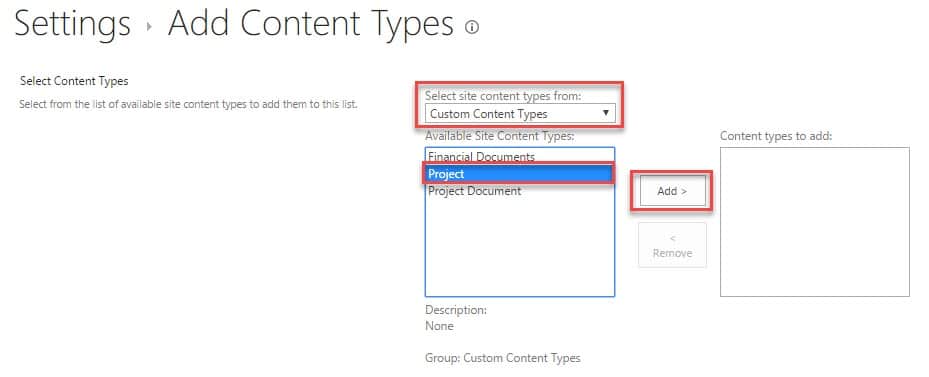
  4. On the next screen, select the group where you filed your custom content type in (Custom Content Types in my case), then choose the name of the content type you created in Step 1 and click Add Button. Once the content type appears in the right panel, click OK.
  5. Your custom content type is now added to the library. By the way, you might also want to remove the default “Document” Content Type that was there originally. To do that, just click on the Document and click Delete this content type

Step 3: Create metadata columns

I won’t go into detailed instructions here on how to create library level metadata columns. Since I have extensively covered this previously, please reference this post for step-by-step instructions.

Step 4: Add metadata to the content Type

You could actually do this step right after Step 1, depending on where and how you want to maintain your content type metadata (site level or library level). In this example, I am creating and maintaining my metadata at the library level.

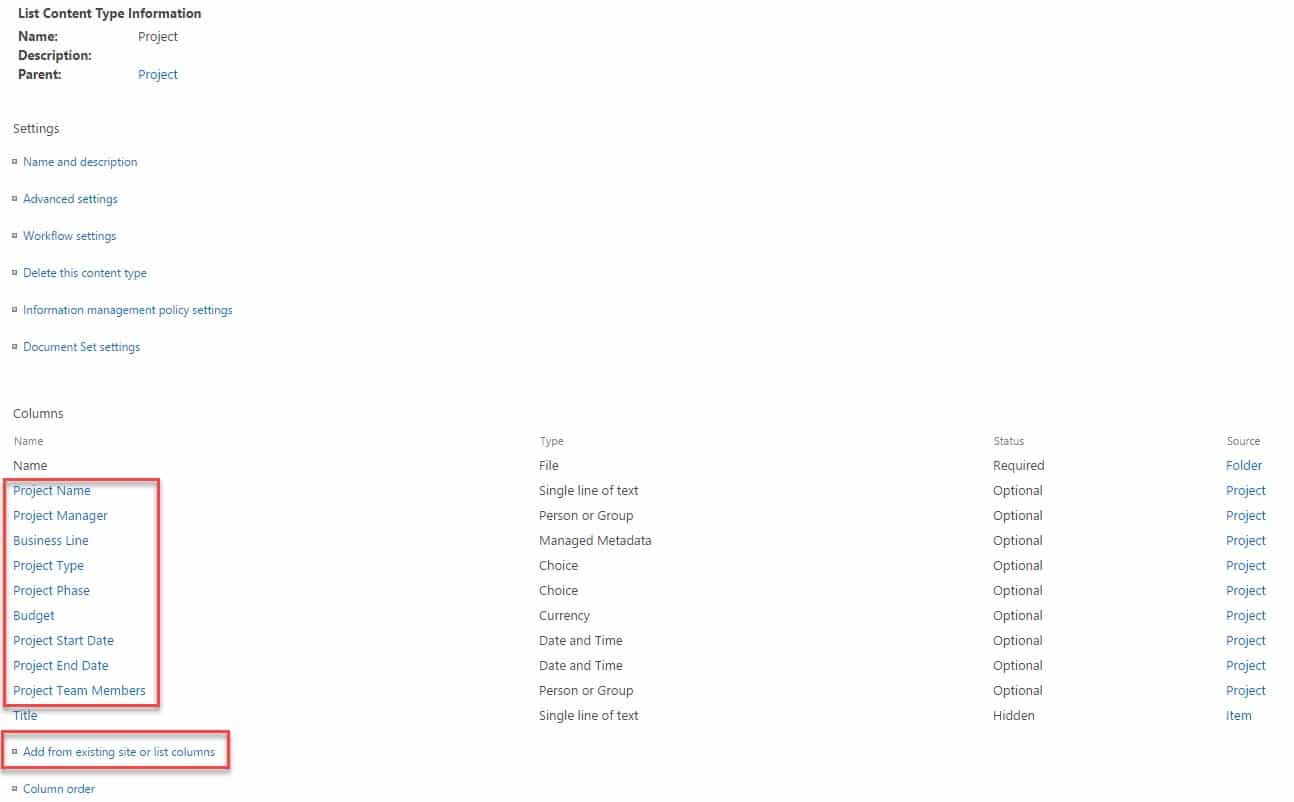
  1. Click on the Document Set content type from within the library settings and you will see a screen that looks like this
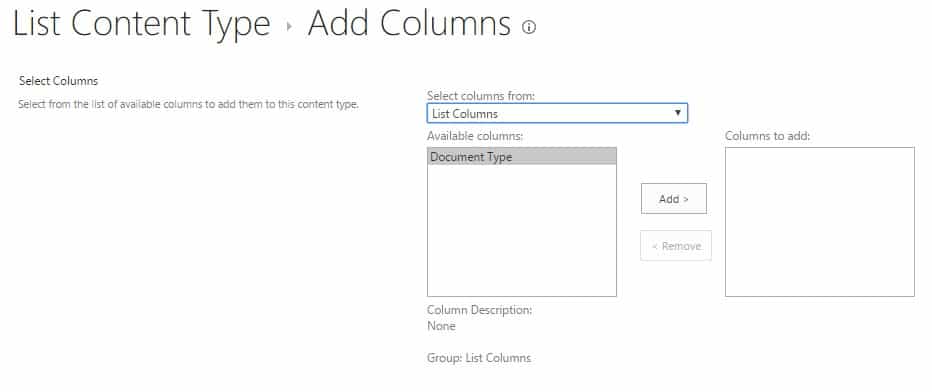
  2. Click on Add from existing site or list columns and add all the list or site columns you want to associate with your document set (folder). This step is very similar to the one above where we added content type from the list of available content types. Click OK.

Step 5: Configure Document Set

This is the exciting part. Now that we have our document set and columns associates, all that remains is the configuration of the Document Set look and feel and behavior.

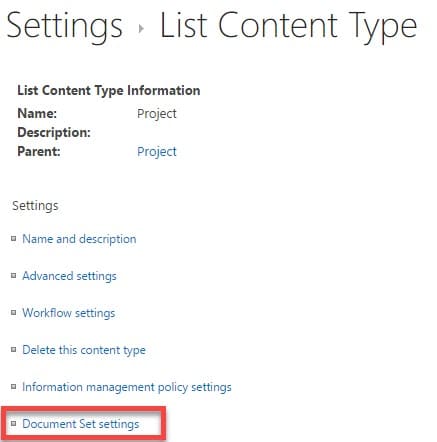
  1. Click on the document set, then Document Set settings
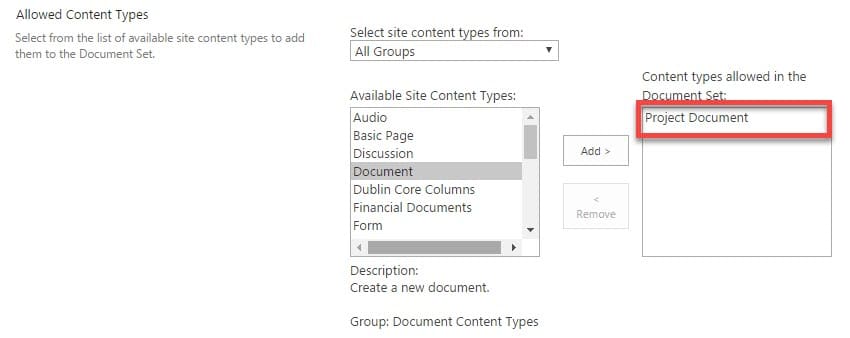
  2. In the Allowed Content Type section, choose the content types that you want to allow within the document set. By default, Document content type will be listed there. However, you can also create and add your own custom content types, with its own metadata, just like I did in the example below.
  3. The Default  Content section allows you to embed certain file templates into each new document set created. You can skip this section if you don’t have any templates to embed.
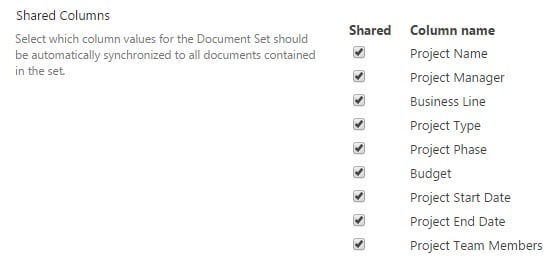
  4. In the Shared Columns section, you can specify which folder-level columns (metadata) will propagate through to the files uploaded into the document set. So if you want your documents to inherit some or all metadata from the folder, just check off the boxes next to columns.
  5. In the Welcome Page Columns section, you can choose the columns that will appear on the Welcome page of each document set.
  6. In the Welcome Page View, you can specify which view will appear as the default view for documents in the Document Set. While you can create many different views to organize documents, you can’t easily between them within the Document Set. So you have to provide only 1 here that will be the only way to view documents.
  7. In the Welcome page section, you can actually customize the look and feel of Welcome Page. To do so, click on Customize the Welcome Page
  8. Then, on the next screen click Page Edit and you can make some adjustments to the look and feel of the page. For example, one thing you can do is replace the default document set graphics with the image/icon to depict yoru document set, like in the example below.

That’s all!

How to create a new document set

  1. Click New from the Document Library main page, then choose the document set (you will probably have one type, but you can have multiple content types to choose from)
  2. On the next screen, just fill in the blanks (all the folder level metadata you created in previous steps). Click OK
  3. Your Document Set (Welcome Page) will now be created. You can now go ahead and upload documents.

How to upload documents to the document set

Same way as into “regular folder”. You can either use the Upload button or just drag and drop documents into the document set.

Document Set limitations

It is all about documents

It is a limitation by default. But If you are thinking of using document sets to manage small projects, all you have on a welcome page is a document set. While you can add other web parts to the welcome page, they will be common to all document sets (in other words, you cannot have each welcome page contain its own task list or calendar for example).

Document Library can get really large

Say you configured a document library to house client data and are using document sets for it. With time, this library might get really large, impacting performance and ability to find stuff.

Metadata sync

If you decide to sync the document library with document sets to your desktop (link) – you would loose the metadata when you try to access the files on your PC. Metadata will stay in SharePoint, but will not get copied onto your computer.

Best use cases for document sets

The following are usually best applications for document sets:

  • Small projects (with each folder being a small project)
  • Financial assets documents (with each document set being a mutual fund)
  • Client documents (with each document set being a client folder)
  • Legal Documents (with each document set being a legal case)

The post Document sets – the hidden gem of SharePoint appeared first on SharePoint Maven.
5 ways users can benefit from Versioning in SharePoint

$
0
0

In my opinion, versioning in SharePoint is one of its strongest features. It allows for tracking the activity of any item (document, event, task, etc.) and following the audit trail. In this post, I would like to highlight the most important features of versioning and how it can assist you, the end user, with your daily routine. Let’s first look at what versioning is and how it works.

How do SharePoint versions work?

Any time you change a document in a document library or edit any list item (in a custom list, calendar, task list, etc.) – a new version is created. Any change is recorded, whether it is a physical change to the document or just a metadata change. If you just view an item or a document by clicking on it – the new version is not created, it is only created when you actually change something.

Which web parts allow versioning?

Any out of the box web part that stores content has Versioning capabilities. That includes the document library, custom list, Announcements, Issue Tracking, Task List, Links, other lists.

How to enable versioning?

If you are in SharePoint Online, versioning is enabled by default in a document library. You have to manually enable versioning in all other web parts. Same will be required if you are not in SharePoint Online – versioning on any list or library would need to be enabled manually. Here is what you need to do to enable versioning on any list or library:

  1. Go to List or Library Settings (depending on whether you are configuring versioning for a list or a document library)
  2. Click on Versioning settings
  3. Choose Create major versions radio button (once again, this is already enabled by default in a document library in SharePoint Online)
  4. Click OK

What are the 2 types of versioning?

You probably noticed in a screenshot above that you can have both minor and major versions. Minor versions allow for more granular version control, they are used for very specific content approval scenarios in SharePoint. They are very rarely used in SharePoint, so I will only concentrate on major versions in this post. However, if you want to learn more about minor versions, check out this interesting post by Ellen van Aken.

What are the primary requirements for versioning to work?

Obviously, versioning needs to be enabled. See instructions above on how to achieve this. The second major requirement applies to documents. For versioning to work, documents need to keep the same file name. In other words, if you upload a document to SharePoint and then download it, change the file name and upload back to the document library – version history will start with 1.0 for that new document. The file name is a primary key identifier!

What are the major benefits of versioning?

1. Ability to audit the history of an item

Version history allows you to retrace the history of an item or a document, since the date and time it was first created till present. If it is a document you are checking, you can see all the changes taking place (physical changes to the document or metadata). If it is an item, like a task or calendar event, you can see the metadata changes made, who made them and when.

2. Ability to track metadata changes

Any metadata changes are perfectly visible in the version history log from above. Say, you have enabled versioning on an Issue Tracking to track help desk tickets. With version history, you can easily see what has happened to the ticket from the time it was submitted to present.

3. Ability to track content changes

If you enable versioning on a document library, you can access any previous versions of the document just by clicking on a previous version link.

4. Ability to restore previous versions

You can also restore older versions if need be. Say you created an important document and then you boss decided to edit and made changes that make no sense. No problem at all. Just click on a drop-down next to the version you would like to restore and click Restore. It will take this version and create a new one for you, making it the latest and greatest.

5. Ability to compare SharePoint versions

This is not necessarily a SharePoint feature, but more of a Word feature. Essentially what you can do is compare different SharePoint versions of the document in Word using MS Word Compare feature. To do this:

  1. Open the document from SharePoint in Word (you have to open it in Word, not Word Online)
  2. Once in Word, click on Review tab, then Compare, then Specific Version
  3. From the next window, choose the version you would like to compare to. In this case, I am comparing Version 5.0 (latest version) to Version 2.0
  4. Click Compare button
  5. It might take few seconds, but on the next screen, you will see the results of the comparison. It will show you several windows: Original Document (Version 2.0), Revised Document (V5.0) and Compared Document (document with all additions/changes/deletions – all in one)


If versioning is a topic you want to read on further, I suggest that you check these three posts from another SharePoint guru, Ellen van Aken.

The post 5 ways users can benefit from Versioning in SharePoint appeared first on SharePoint Maven.

How to approve documents without building a workflow

$
0
0

Quite often, my clients are asking me to build an approval workflow for them. For some complicated parallel or serial approvals, you have to either use SharePoint Designer or Microsoft Flow or some 3rd party workflow tool. However, most just require a simple approval process for documentation. The scenario I am talking about here is users uploading documents to a document library and certain individuals approving or rejecting them. If this is the case, you are in luck, since there is a cool Out of the Box (OOTB) feature that allows you to do just that. By enabling this feature, you will be able to approve documents without building a workflow. Let me explain how it works.

Before we go into the details, it is important to note that the approval process we have here is pretty simple in nature. Document uploaded/submitted by one user and then either approved or rejected by another.

  • Step 1: Document uploaded/submitted by one user
  • Step 2: Document approved or rejected by another user

If you need a multi-step serial or parallel approval, or if you need the approval to go to different individuals based on the type of document – you might need to look for alternate workflow options (SharePoint Designer, Microsoft Flow, 3rd party tools).

To make this simple workflow work, we will rely on two out-of-the-box functionalities of SharePoint:

  1. Content Approval feature on a document library
  2. Alerts on SharePoint lists and libraries

Content Approval feature will be used to allow approvers (certain users) to either approve or reject a document. Alerts will be used for email notification to notify managers (approvers) when items are uploaded so they can go ahead and either approve or reject a document. Alerts can also be used to notify the submitter when the document has been either approved or rejected so they can proceed accordingly. Let’s begin and set this up; it won’t take long!

Step 1: Enable Content Approval feature on a document library

  1. Library Settings > Versioning Settings
  2. Enable Content Approval feature by selecting “Yes” under Require content approval for submitted items?
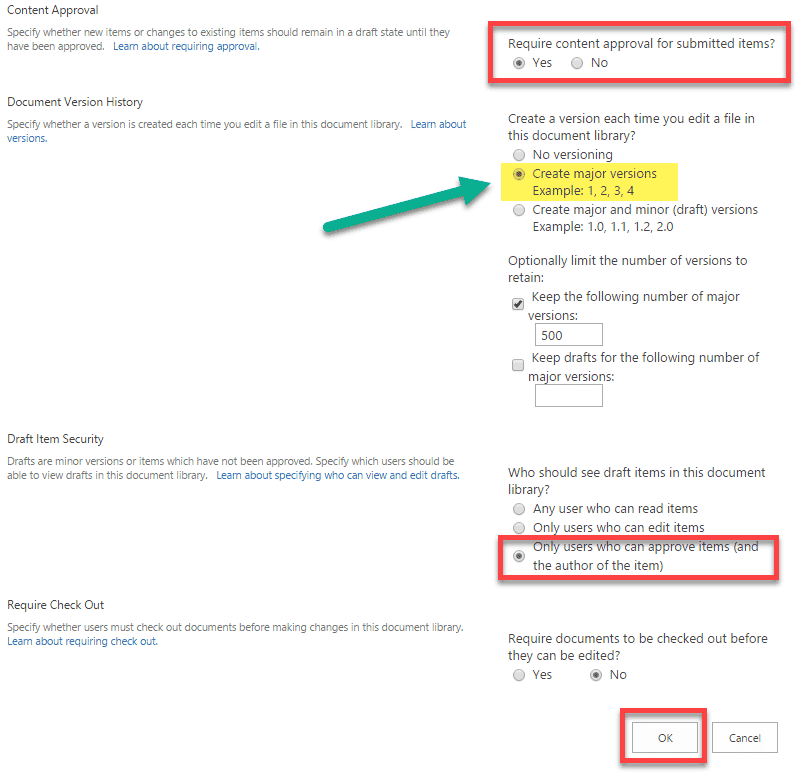
  3. Once you check “Yes” radio button above, you also will have a chance to set some other options, like Major or Minor versioning and Draft Item Security. Let’s leave Major Versioning on for now (no minor versions). I will explain how you can use the minor version later in this post. The most important setting here is  Only users who can approve items (and the author of the item). It is set for you by default. That means that documents that are in Pending or Rejected state will only be seen by those who uploaded them, and those are the approvers. Once approved, they will be seen by everyone. That is usually the scenario you want anyway.
  4. Click OK at the bottom of the screen
  5. Come back to the library. You will see that there has been a new column added to the library called Approval Statusapprove documents without building a workflow
  6. There is actually another column that has been added as a result of Content Approval feature. It is just it is not displayed. The column is called Approver Comments. It is hidden in the All Documents View. By the way, you also now have additional views as well, which you can see from Views drop-down. Two views have been added: Approve/reject Items and My submissions. Check both of them out, they are pretty self-explanatory. Both display that Approver Comments column.approve documents without building a workflow

Step 2: Set up alerts

While now we have an approval mechanism, we do not have anything to send email notifications when documents are uploaded for approval. This is pretty much a self-serve feature. For example, a manager can go in and set up an alert to be notified when items are added or modified, so he or she can get timely notifications about new files uploaded. The submitter can also set his/her alerts as well. I have provided step-by-step instructions on how to set up alerts here, so please check out that post. It is very easy!

How Content Approval Feature works

Let’s go ahead and upload a document for approval.

  1. Drag and drop a document or upload a new document into the library (you can have another user do this so you can test the true “workflow” functionality).
  2. Notice how it will default the Status to Pending
  3. So at the moment the document can only be seen by the submitter and approvers, nobody else (because of Pending Status)
  4. Let’s go ahead and Reject this document. Right-click or click on ellipsis (3 dots) > More > Approve/Reject.
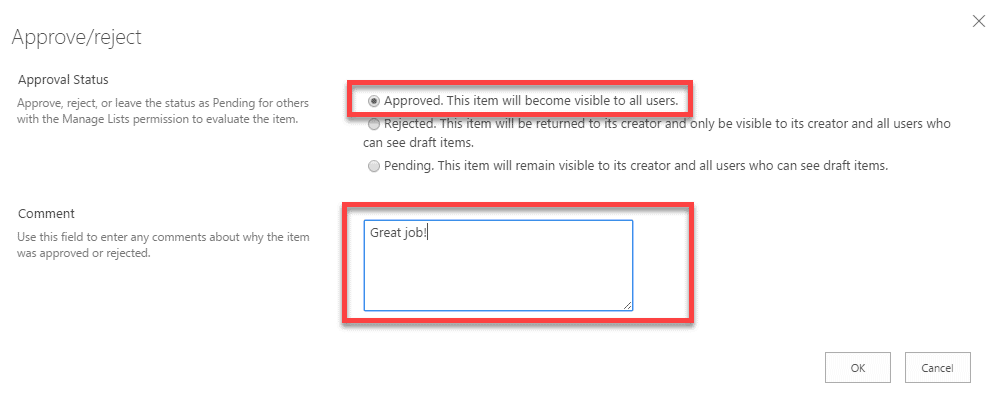
  5. On the next screen, choose Rejected radio button, provide rejection comments and click OK
  6. The document status has been switched to Rejected. If the submitter goes into the library and chooses My Submissions view, the document will be right there with Rejected status and rejection comments. Once again, since the document is not approved, it is only visible to submitter and approver at the moment.
  7. At this point, the submitter can make changes, upload a different version of the document. Every time a new version of the document is uploaded or document is edited in SharePoint, the status changes back to Pending and document can once again be approved by the Approver. This is important to understand!
  8. So let’s say the document has been edited or re-uploaded. It goes back to Pending status.
  9. This time the approver is kind enough to approve the document
  10. At this point, the status changes to Approved and document can finally be seen by everyone having access to the library. By the way, you can also view the Version History and see the whole history of changes as well.

 Who will see documents

It depends on how you set Draft Item Security.

If you keep the default option above (recommended), up until the document is Approved, it can only be seen by Submitter and those who have Approval capabilities. More on this below.

Who can approve documents

In order to Approve documents, you need to have special Approval powers. This can be done in 1 of the 2 ways:

  • If your site collection does not have Publishing features enabled, assign Design permission level to the approvers (Design permission level has Approve capabilities, Contribute/Edit do not)
  • If your site collection has publishing features enabled, you should have special Approvers group created for you which has Approval capabilities. Make sure to add this group to your site and add approvers into the group

Bonus: Advanced Configuration Options

We can also take advantage of minor versioning and create a truly great publishing experience, often needed for the Approvals. Remember, how above I mentioned that once rejected, submitter can make changes to the document? However, every time I make a change, the document Status goes back to Pending.  This might not be desired. Say, I make some changes to the document (because my @#$% boss rejected it), but I am not ready to re-submit for the approval just yet. I really want to re-submit when I am ready to do so (hey, I ain’t going to have it rejected again!). For this to work, we will need to enable minor versioning.

  1. Go back to Library Settings and enable minor versioning
  2. Go ahead and upload a document again. Notice how the Status of the document says Draft (instead of Pending). Draft means the document is not published just yet. At the moment, the document is only visible to the Submitter and the Approver. However, it can’t be approved or rejected because it is still in Draft.
  3. If you lookup the version, it will be 0.1 instead of 1.0
  4. When the user is ready to submit, user can publish it
  5. You can even supply the comments to advise on the changes made, so the approver knows what has changed.
  6. Once published, the Status changes from Draft to Pending and can now be approved by the Approver.

The post How to approve documents without building a workflow appeared first on SharePoint Maven.

How to live without Windows Explorer in SharePoint Online

$
0
0

If you have stumbled upon this post, you most likely have been utilizing Windows Explorer functionality in SharePoint to access and work with files and folders. Since the majority of organizations have been using SharePoint as a file share, the Open with Explorer button acted as a pacifier for those craving to work with SharePoint in a familiar fashion. But times have changed, and this feature is becoming less and less relevant. With this post, I would like to explain why you actually no longer need it and why it might be a good time to wean off the old habit.

What finally makes the transition possible is the fact that SharePoint Online now has a new and modern document library. Listed below are some of the reasons why Windows Explorer was so popular, as well as the way of achieving same functionality without it.

Windows Explorer

Why you no longer need Windows Explorer

Multiple files upload

The old (classical) document library only allowed to upload up to 100 files at a time. If the number of files exceeded 100, you would get the message below.

So you either had to break files into multiple batches or open the library with Windows Explorer and move them that way. The new document library no longer has such a limit, so you can easily upload thousands of files all in one shot.

Folder upload

A much bigger requirement was the need to upload folders into a SharePoint document library. The old library lacked that capability altogether. You either had to recreate folders one by one or open with Windows Explorer and move folders with content that way. When you tried to drag and drop folders into the library, you faced a nasty error message.

The new document library has the ability to upload folders with content as well as the ability to drag and drop folders, saving you time and frustration associated with opening up a separate Windows Explorer window.

Move files and folders within the library

Ability to change folder structure or location of files in the library also demanded the use of Windows Explorer. There was just no way to do this at all within the document library by itself.

Not anymore! The new document library allows you to change the location of files and folders right within the browser by dragging and dropping things just like you would with the Windows Explorer.

Copy or Move files and folders between libraries and OneDrive

One other reason users stuck with Windows Explorer was when they needed to move files and folders between libraries on the same or other sites. Once again, that was just not possible with the classical library. In the new document library, there is now an ability to move and copy files and folders between libraries on other sites as well as OneDrive.

I am a Windows Explorer addict. How do I access it with the new Document library?

If none of the above points convinced you to dump the old habit, you can still access Windows Explorer in the new document library. Here are the steps:

  1. Make sure you are using Internet Explorer or Edge browser (the function is not available in any other browsers)
  2. Navigate to the root of your document library
  3. Under the view selector, choose “View in File Explorer“. This is the new name for “Open with Explorer“. The Explorer window should open up in 10-15 seconds.

The post How to live without Windows Explorer in SharePoint Online appeared first on SharePoint Maven.


3 out of the box ways to save emails in SharePoint

$
0
0

SharePoint is great for storing all sorts of content we generate these days. Word, Excel, PowerPoint files, images, videos, and PDFs. However, we also generate another type of content where we might store important decisions, intellectual property or other relevant information in. I am talking about good, old email. Naturally, the email messages and attachments reside in a different tool called Exchange (if you are using Outlook mail client). So are there ways to store email alongside the documents? There are few options available out of the box, and I will try to explain them in this post.

Option 1. Site mailbox app

NOTE: This option is no longer available in SharePoint Online (as of March 2017). Please click here to read more. It is only available in hosted SharePoint 2013 or 2016 environments.

The first option that allows storing emails is called Site Mailbox app. Essentially, it is a dedicated mailbox for the SharePoint team site. To add one, go to Gear Icon > Site Contents > Add an App and then choose Site Mailbox from the list.

It might take up to 30 minutes to set one up. Any emails sent to this mailbox (distribution list) will be stored within the site mailbox on Exchange. Technically speaking, the emails are not stored in SharePoint, like documents in a document library. They are stored in Exchange, where all of your emails are stored. However, this allows you to have a dedicated space to store all email-type content.

save emails in SharePoint


Option 2. Office 365 groups

Another way to store emails alongside the documents is to use Office 365 Groups. Office 365 Groups is essentially a membership group, packaged together with a shared document library, calendar, OneNote notebook and distribution list. Emails sent to the Office 365 Group distribution list end up in the Conversations part of Office 365 Groups. It works very similar to the mailbox from the previous example but allows for a more fluid/conversation style email exchange and experience. Moreover, conversations can also be started from the Office 365 Groups itself and emails can be sent by external parties to the distribution list too.


Option 3: Drag and Drop Outlook messages

If you really want to be able to save your emails in SharePoint just like regular documents, you have to use this third option. To do that, you need to first Save your email as a file to your desktop – then drag and drop that file into a SharePoint document library. The beauty of this method – the whole email you save from the Outlook stays in native format + keeps all the attachments inside.

  1. To save the email with all of its contents and attachments, just drag it from your Outlook to the desktop.
  2. Then, just upload or drag and drop the file from the desktop into the destination library in SharePoint, like you normally would
  3. If you are using metadata in your library, you can tag it like any other file as well.

Other options:

Cameron Dwyer has written some great and very detailed posts on out of the box ways to get emails into SharePoint. Check out this post and this one for other available options.

The post 3 out of the box ways to save emails in SharePoint appeared first on SharePoint Maven.

Solve all your SharePoint sync issues by using the new OneDrive Sync Client

$
0
0

I have been waiting for quite some time to write this post. And finally happy I can do that. Let me explain.

For some time, those relying heavily on the sync capability of SharePoint were somewhat out of luck. While OneDrive sync client for SharePoint existed, it was not reliable, caused various sync conflicts, missing documents, and frustrated users. I even published a separate post on the topic where I advised my clients to avoid sync if possible. At the same time, a separate OneDrive sync client for OneDrive itself worked like a charm (sync from user’s own OneDrive for Business account).

So what happened recently – Microsoft fixed the SharePoint Document Libraries’ sync issues by releasing the new OneDrive sync client that was now compatible with both OneDrive and SharePoint document libraries. The new OneDrive sync client now is very stable, addresses the issues and limits that plagued the old sync client, allows folder-by-folder (selective) sync and is THE SINGLE client for both OneDrive and SharePoint.

However, for your organization to take advantage of the new client, you need to follow steps outlined below.

How to configure the new OneDrive sync client

Step 1: Enable the new sync client in SharePoint Admin Center

If you had Office 365 environment for a while and had used an old sync client before, you first need to enable the new sync client. To do that:

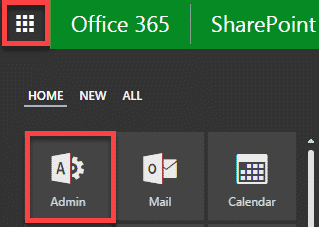
  1. Go to Office 365 Admin Center (Waffle Icon > Admin Tile)
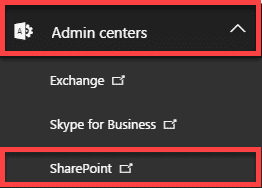
  2. Proceed to SharePoint Admin Center (Admin Centers > SharePoint)
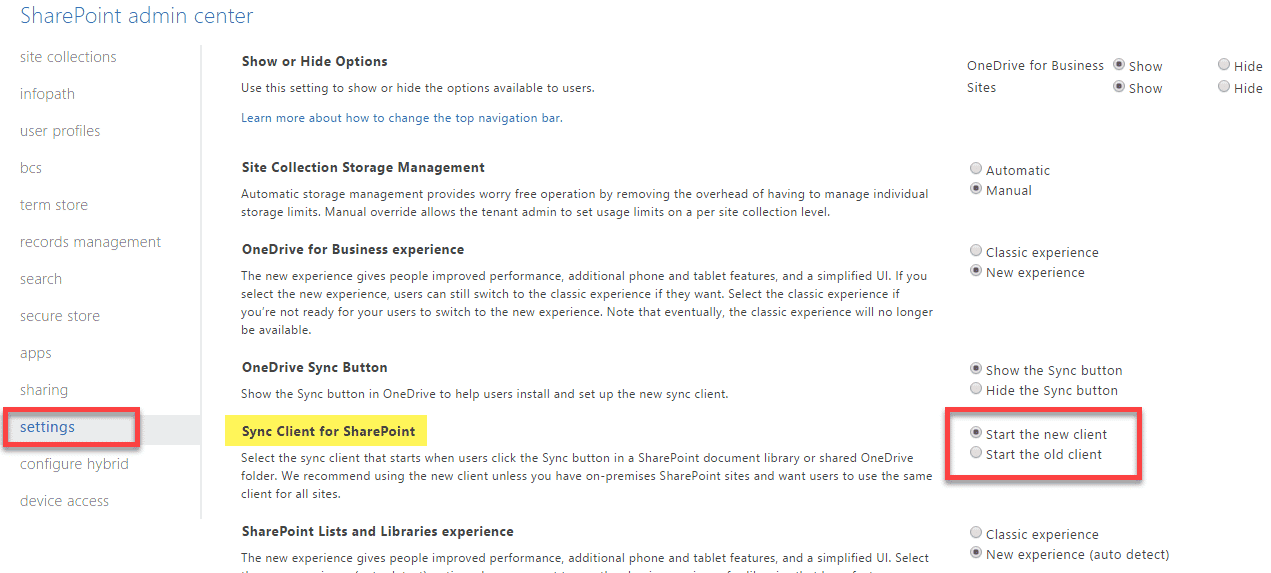
  3. Click on Settings, then choose “Start the new client” radio buttonnew OneDrive Sync Client
  4. Click OK at the bottom of the page.

Step 2: Wait for few hours

Once you enable the new sync client above, you have to wait for few hours for the change to propagate in your environment. This might be a good time to read my blog or watch educational videos on my YouTube channel.

Step 3. Uninstall the old sync client from the users’ desktop

Now go ahead and uninstall the old sync client on the desktop, you will no longer need it.  Instructions for this step depend on your Operating System, so follow the steps you normally would, to uninstall the program from your computer. Make sure you choose the correct program to uninstall (Microsoft OneDrive for Business 2013 which is an old client and not Microsoft OneDrive – which is the new client)

new OneDrive Sync Client

Step 4. Re-Sync the libraries

Since the sync will now be handled by the new client, you will need to resync the libraries you synchronized previously using the new client. Do this for all the libraries you need to sync/resync.

new OneDrive Sync Client

new OneDrive Sync Client

Step 5. Selective sync of folders

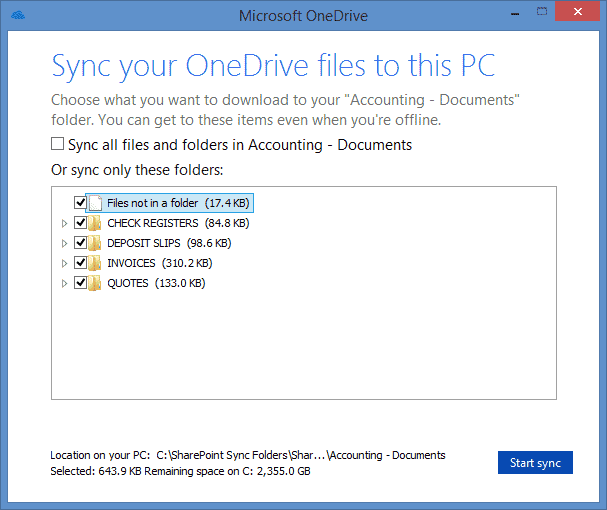
This step is optional, but thanks to the new sync client, you can now select which folders you want to sync with your PC/laptop. Say your document library has 10,000 files spread among multiple folders. Well, may be all you need offline are just a few files in a particular folder. With the old client, it was either all or nothing. The new client allows you to do a selective sync and choose particular folders to sync.

new OneDrive Sync Client

new OneDrive Sync Client

The post Solve all your SharePoint sync issues by using the new OneDrive Sync Client appeared first on SharePoint Maven.

Folder vs. Library in SharePoint

$
0
0

I have written a number of posts in previous years explaining the difference between common SharePoint entities like sites and site collections, sites and pages. Understanding those concepts above takes time, but it makes sense. The concept I will explain today takes more time to “sink in”. It is a concept of Folders vs. Document Library.

What’s the difference between a folder and a library in SharePoint?

Most document management systems we have been using over the years all use folders. File shares, DropBox and even Microsoft’s own OneDrive all use folders. We know how they work, they are easy to create and organize information in. By the way, before we go too far, I advise that you check out one my most popular blog post on why folders in SharePoint are bad.

In SharePoint, however, we have another layer to organize content in and that is a document library. True, you can create a single site with a single document library and put all of the company’s folders there, essentially simulating file share, but that is not a great practice. So what is a document library and why you should have many of them? Let me try and explain.

Think of a document library as a file cabinet with folders inside

Folder vs. Library in SharePoint

I remember when I worked for various companies in 1990’s when we were still heavily involved in the paper world, file cabinets were a centerpiece in each office. Some were used to store invoices; some were used for storing engineering drawings, some legal information, some for personal information, etc.

Fast-forward 20 years and now we have electronic folders in place of physical folders and document libraries in place of file cabinets. Let me use an example of Accounting team and how they could use the concept of multiple Document Libraries in SharePoint.

Folder vs. Library in SharePoint

A document library with a number of folders

First, Accounting team would have a dedicated SharePoint site. They could have many sites of course, but let’s keep it simple. On that site, they would have a few document libraries (again, think file cabinets). One for invoices, one for scanned receipts and say one for bank deposit slips. Each library would then have folders or metadata to organize the type of content they would have (invoices, receipts, deposit slips). True, nothing stops them from putting everything in just 1 library (just like in the image above) and have a folder for each type of content. However, by separating content in different libraries, they can also achieve the following benefits:

  • Each library can have different means of file organization. For example, deposit slips library could utilize folders, while invoices can be organized via metadata (customer name, invoice date, etc.)
  • Each library can have unique security. By default, document libraries inherit permissions from the parent (site). But you can have unique permissions if you wish. This way, say, scanned receipts library can be visible to everyone, while, say, invoices would only be visible to select few. Now, it is always better to maintain security at the site level and not break permissions at the library level, but in case you needed this flexibility – it is available.
  • If you are into metadata, each library can have its own mix of content types

If you are now sold on the concept of multiple document libraries before you go ahead and create a site with 25 document libraries, you should also be aware of some of the downsides:

  • When you search in a single document library via search box – you get a nice user interface for search results. However…

Folder vs. Library in SharePoint

  • …Searching across multiple libraries is a somewhat of a challenge as you now have to use site search box and results are presented in less user-friendly format. I have written the whole post dedicated to this very topic – so check it out.
  • Moving and Copying across libraries is not as simple as moving across folders in the same library (though it is getting better with the recent introduction of new Move/Copy functionality).

Best Practices for Document Libraries

  • Do not create too many libraries per site. Use the minimum number possible. When I come to your SharePoint site, if I see 15 document libraries, I will be overwhelmed. I might be confused where to upload the stuff into. I am not trying to say that you should use a single library – but try not to overwhelm the end users with too many selection choices
  • Use logical names for document libraries. If you plan to store invoices in there, call the library “invoices” and not “documents.”
  • Do not break permissions at the library level. If you need unique security – create a separate site
  • Do not use a default library – just create your own ones. Reference this blog post why you should never use default document library

The post Folder vs. Library in SharePoint appeared first on SharePoint Maven.

Don’t change that default view in SharePoint!

$
0
0

Where SharePoint really shines is its flexibility with metadata and views. The new library experience and the new custom list experience make it really easy to add/edit metadata columns and create views on the fly. Out of the box, you always get a single view, usually called All Documents (in the document library) or All items (in tasks or custom list). Today I want to explain why you should never touch that default view and instead, create your own custom views, should you decide to view information differently.

Reason # 1: Default view is “catch all” view

By default, the out of the box All Documents or All Items views are not filtered or grouped in any way. So in other words, it shows you things as-is. If you start messing around with the default view, you might inadvertently hide some content, if you do any kind of filtering, for example.

default view in SharePoint

Reason # 2: Quick Edit feature

If you want you to bulk edit metadata, you can do it very quickly using the Quick Edit function. The thing is, this feature (that I described in this post) only works in the non-grouped view. So if you decided to alter the default view and group it by a certain column – Quick Edit option won’t be available and you have to ungroup things or create another “flat list view.”

default view in SharePoint


default view in SharePoint

Reason # 3: Some operations are only allowed in non-filtered, non-grouped & non-sorted views

Just like with the Quick Edit above, some functions on certain lists don’t work if your view is grouped, sorted or filtered. Case in point: in the Tasks web part, if you try to indent tasks in the filtered view (i.e. My Tasks) – you will get the following error message: We can’t modify hierarchy on a view that is sorted/filtered/grouped.

default view in SharePoint

Reason # 4: Any view can be made a default view

If you do not like the plain vanilla default (All Document or All Items) view, you can make any other view a default one! You can do so at any point by modifying the view and clicking Make this the default view check box. What that means is that when users click on a document library or a list, the first view that will be displayed is that new default one you just created.

default view in SharePoint

Reason # 5: The more views – the better

One of the reasons you probably opted for metadata was the ability to view things differently depending on your needs. So you should never rely on a single view anyway. The more views you create – the better it is for your end users (think user adoption!)

default view in SharePoint

The post Don’t change that default view in SharePoint! appeared first on SharePoint Maven.

Co-authoring documents in SharePoint

$
0
0

One of the great capabilities of SharePoint is the ability for multiple users to work on the same document at the same time (also know as co-authoring). This functionality enhances collaboration, improves user experience and adoption of SharePoint.

What is Co-Authoring?

Co-Authoring in SharePoint is a formal name for multiple (2 or more) users collaborating together on the same file/document at the same time.

What type of files can you co-author?

As of the writing of this blog post, you can co-author the following MS Office files:

  • Word
  • Excel
  • PowerPoint
  • OneNote

How to enable Co-Authoring?

You do not need to enable it. In SharePoint Online, co-authoring is enabled by default.

How does Co-Authoring work

Word

Co-authoring works best with Word documents. It behaves a little bit differently in Word Online vs. native Word Application, but it works! When 2 or more users edit the document at the same time, they get to see “each other’s presence” and changes as they happen live.

Co-authoring documents in SharePoint

Live changes as they happen in Word Online

Co-authoring documents in SharePoint

Notification in the upper-right-hand corner of Word Online when another user edits at the same time

Co-authoring documents in SharePoint

Notification in the upper-right-hand corner of Word native application when another user edits at the same time

Excel

Co-Authoring in Excel works only in Excel Online (as of writing of this post). Just like Word, you get presence notifications in the upper-right-hand corner. When edits are made to cells, they happen live and changed cells are highlighted with user indicator.

Co-authoring documents in SharePoint

When trying to edit a document using Excel native application, the second user trying to edit a document will get a notification message below. In other words, co-authoring using Excel native application does not work.

Co-authoring documents in SharePoint

NOTE: It looks like Co-Authoring in Excel will soon work with native, desktop Excel app, according to this article. I will update my post when this happens.

PowerPoint

Co-authoring works well with PowerPoint. Just like with Word, you see another user’s presence in the upper-right-hand corner. It works both with PowerPoint Online (edit in the browser), as well as the native PowerPoint application.

Co-authoring documents in SharePoint

Notification in the upper-right-hand corner of PowerPoint Online when another user edits at the same time

Co-authoring documents in SharePoint

Live changes as they happen in PowerPoint native application

Co-authoring documents in SharePoint

Notification in the upper-right-hand corner of PowerPoint native application when another user edits at the same time

OneNote

OneNote also works well with co-authoring. It provides a very similar notification mechanism as well when multiple users change same OneNote page. Changes take place live as well. Co-authoring with OneNote works well with both browser editing and native application.

Co-authoring documents in SharePoint

Notification in the upper-right-hand corner of OneNote Online when another user edits at the same time

Co-authoring documents in SharePoint

Live changes as they happen in OneNote Desktop (native application)

How does versioning work with Co-Authoring?

Great question. When 2 or more people are editing the file at the same time, it saves file  everyone once in a while (every minute or so – nobody knows for sure an exact formula), and whoever is the last one to make changes at the time of “save” – that name is registered in the version history. In the example below, you can see changes to the file done by two users co-authoring in the span of 1 minute.

The post Co-authoring documents in SharePoint appeared first on SharePoint Maven.

6 ways to save files to SharePoint

$
0
0

I had an interesting and trivial question being asked the other day by one of my clients. “How do I save files to SharePoint?” I almost responded, “You must be kidding.” I thought, just like breathing and eating – this was intuitive and common knowledge. But then, as I was explaining the options, I realized that there are way too many techniques to save files to SharePoint, each with its pros and cons. So, to answer my clients’ question and for my own sanity, I decided to write this post and document all the options for you. Here we go.

Method 1: Upload Button

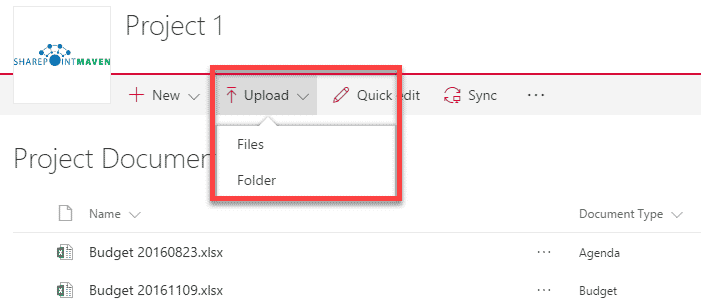
The most basic and intuitive option would be to use the Upload button on the library. For those who are in SharePoint Online, you can upload multiple files and folders. Those living with older versions of SharePoint or those who run SharePoint on-premises or those still running classical look and feel of a document library – you can only upload one file at a time using this method.

save files to SharePoint

Method 2: Drag and Drop

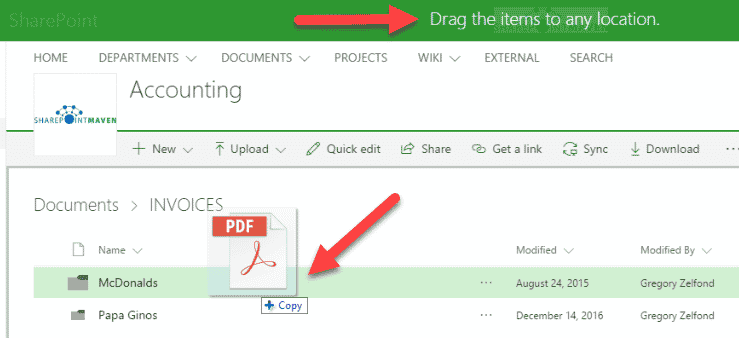
This is the new feature that became available with SharePoint Online/SharePoint 2013. The convenience factor here is that you can drag and drop multiple files and folders from any location right onto your browser. Please note that just like with previous option, you cannot drag and drop folders unless you have SharePoint Online and use modern experience for a document library.

save files to SharePoint

Method 3: Save As from Word, Excel, PowerPoint

If you are authoring a brand new document in Word, Excel, PowerPoint or OneNote, you can save documents directly to a specific SharePoint site/library. This might prove very convenient, as you don’t need to save a document to the desktop first and then upload to SharePoint, eliminating an unnecessary step.

Here is how you do this:

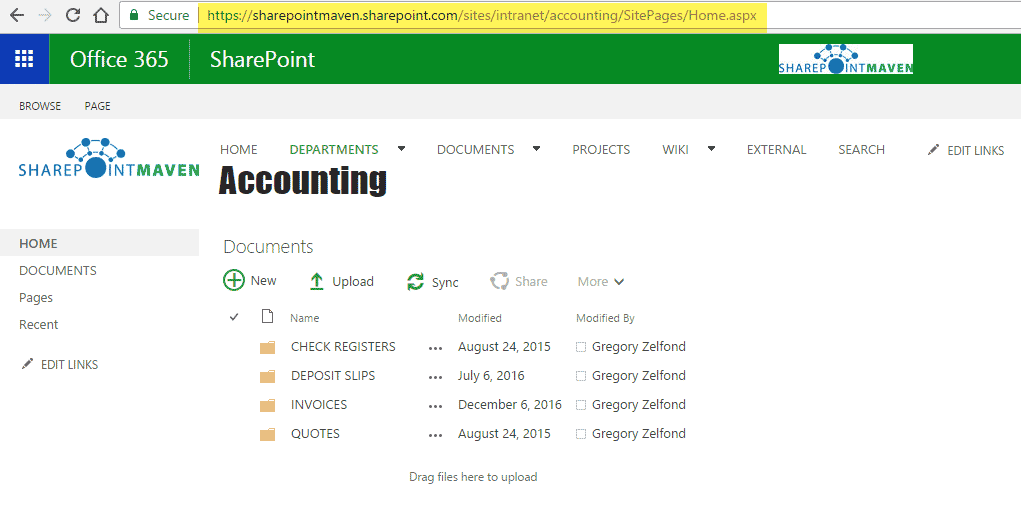
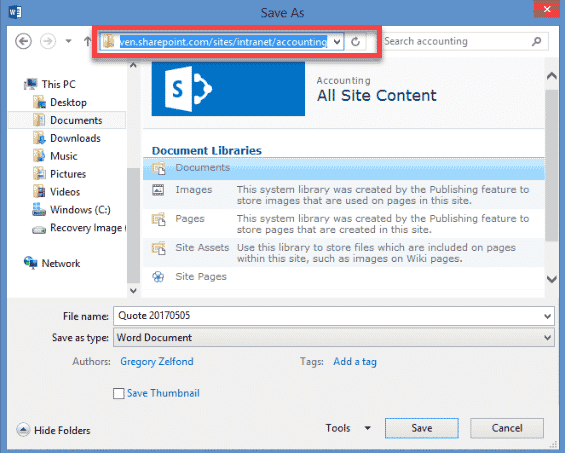
  1. Copy the URL of a SharePoint site you want to save a document tosave files to SharePoint
  2. From Word, Excel, PowerPoint or OneNote, do File > Save As > Browse. In the window that pops up, paste the URL of the SharePoint Site in the address window. Make sure to not include the full path though. For example, if your site address is https://companyname.sharepoint.com/sites/intranet/accounting/SitePages/Home.aspx, only paste the part up to /Sites/Home.apsx (https://companyname.sharepoint.com/sites/intranet/accounting). Otherwise, it won’t resolve, and you will get an error message.
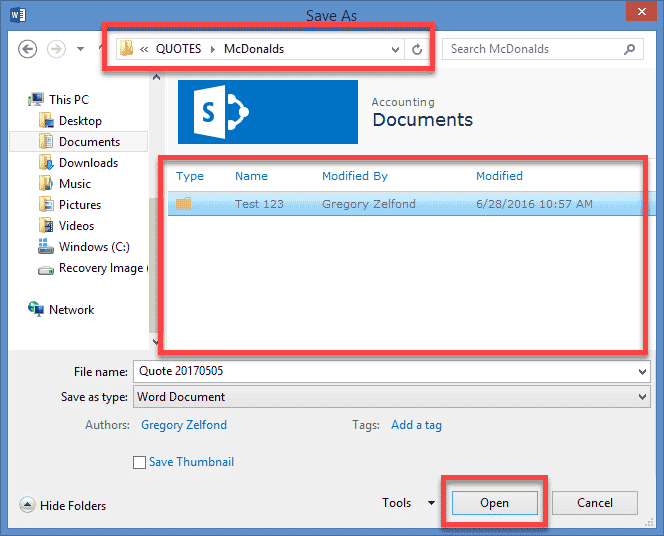
  3. Once you do the above, you will see contents of the site. So just navigate to a library and specific folder where you want to save a document to and click Opensave files to SharePoint
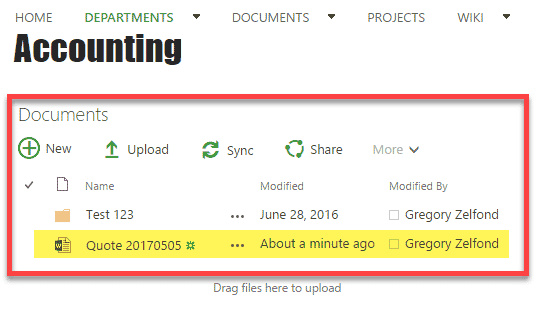
  4. The document is now saved directly to SharePointsave files to SharePoint

NOTE:

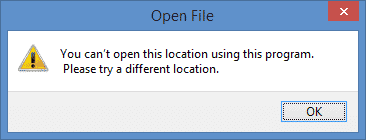
In Step 2 above, you could also paste the URL of a document library itself, not the whole site. However, just like described in Step 2 above, make sure to paste the URL of a library itself, do not include the path to a specific view. For example, if the full path to a library/view is https://companyname.sharepoint.com/sites/intranet/accounting/Shared%20Documents/Forms/AllItems.aspx, the path you need to paste in the address bar of the pop-up is https://companyname.sharepoint.com/sites/intranet/accounting/Shared%20Documents (without /Forms/AllItems.aspx).

Otherwise, the location will not resolve, and you will get below error message:

save files to SharePoint

Method 4: Create new Office Online document

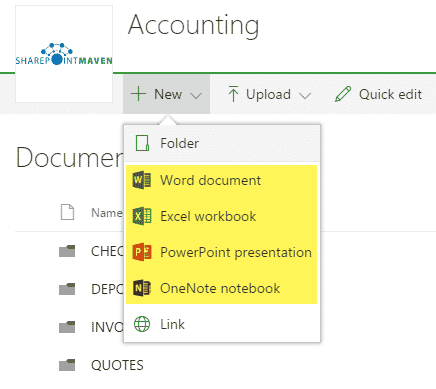
Another way to save files to SharePoint is to create them from SharePoint! 🙂 Instead of creating new documents in Word or Excel on your desktop, you can use the “New” drop-down button and choose the file you want to create. You can choose from Word, Excel, PowerPoint and OneNote.

save files to SharePoint

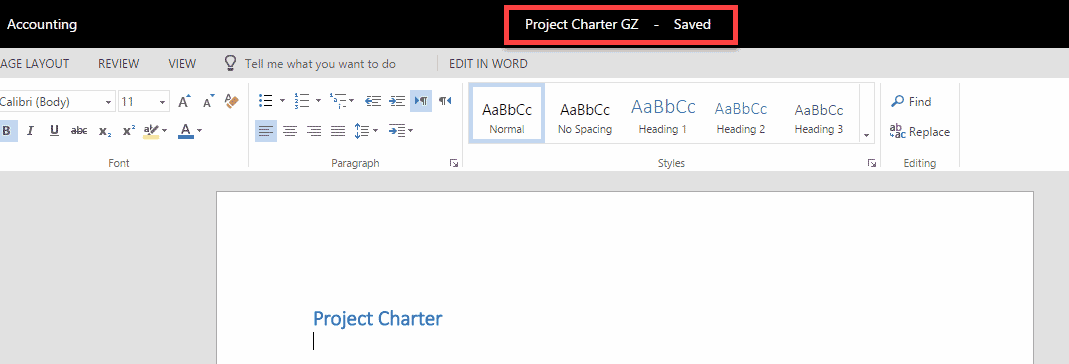
The beauty of this method is that files created this way are getting automatically saved into the document library/folder where you clicked the “New” button from! Moreover, no need to be paranoid about hitting the Save button – document is auto-saved for you, courtesy of Office Online capabilities.

Method 5: Upload via Windows Explorer (File Explorer)

Another option for you to save files to SharePoint is via Windows Explorer. When you open a document library via Windows Explorer, it opens up a regular File Explorer window, and you can drag and drop your documents and folders, just like you are moving/copying files in Windows. This is not my favorite option, and I actually published a post on why you no longer need this. You might resort to this option only if you have a classical document library, run SharePoint on-premises or have non-Microsoft Office files (i.e. AutoCAD or Photoshop files). If you use modern library experience, use any of the above options instead.

Method 6: Upload via OneDrive Sync Client

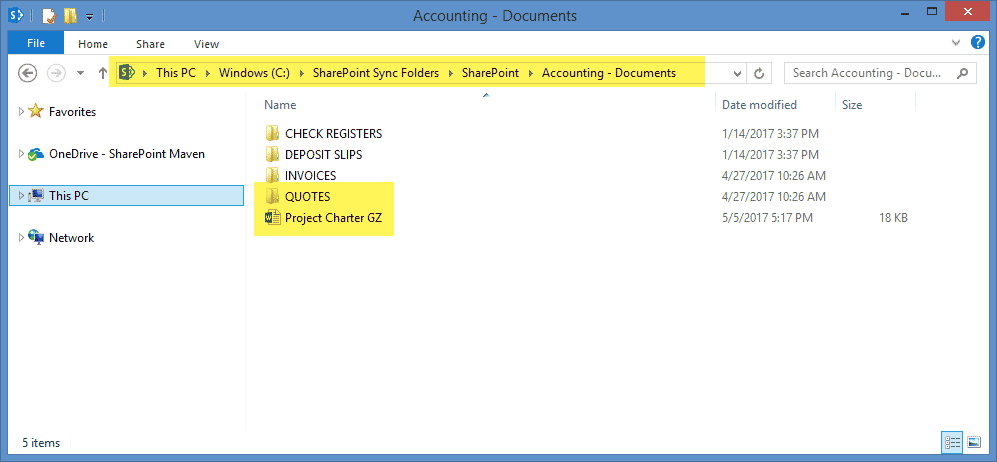
Another option for you to save the files to SharePoint is by using OneDrive sync client. What that means is that you Save your files to the OneDrive sync folder on your C: drive, to a previously synchronized document library and the sync does the rest by syncing (copying) the files to SharePoint Online. To read more about this feature – click here.

Other options:

Peter Kalmström of kalmstrom.com Business Solutions has a great video describing some of the above options + few additional ones, so feel free to check out his post here.

The post 6 ways to save files to SharePoint appeared first on SharePoint Maven.

3 reasons you need File Type metadata column in a document library

$
0
0

Your SharePoint Document library might contain lots of different files. Word, Excel, PowerPoint, PDF, CAD or Photoshop ones. What if you wanted to filter and quickly find only files with a certain file type? Guess what – you do have such capability right Out of the Box. Let me show you how to do that. Moreover, I will explain other uses for the File Type metadata column.

file typeHow to filter for file types

File type happens to be a system metadata on a document. And since it is metadata, in SharePoint, it is represented via a column.

filetype1

By looking at the column, you can easily see the file type: Word, Excel, PowerPoint, PDF, Image or folder.

Did you know you could filter this column to find certain documents quickly? Say, I only need to display all the Excel files. Just click on the column header and filter by the corresponding file type of your choice.

filetype2

filetype3

Why you should never hide the File Type Metadata column

The reason I mention this is because I have seen some of my clients actually remove the file type column from the view (I guess in an effort to save space). So here are the reasons why you need to leave it in place as-is:

  1. File Filtering: The obvious reason stated above
  2. File or Folder: To quickly see what the type of the file is for each document. Without it, you will not be able to differentiate between files and folders! See below. Yes, you can look at file extensions, but it is not as friendly as with the icons.filetype5
  3. Check-out feature: Lastly, if you ever use file check-out functionality, file type column displays an arrow for checked-out files. Without it, you won’t know if the file is checked out or not.filetype4

filetype6


The post 3 reasons you need File Type metadata column in a document library appeared first on SharePoint Maven.


How to smoothly transition your users from folders to metadata

$
0
0

I get this question all the time. It goes something like this. “Yeah, Greg, we know you love metadata, and it makes sense to me, but how do I convince my users to use it and switch from folders to metadata? We tried this before, and it did not work.” Well, in case you are asking yourself the same question as you read this, I am glad you asked. In this post, I would like to provide you with some tips on how to ease your users into the world of metadata. It is not that hard at all! And our assistant today will be the new Document Library available to those in SharePoint Online. If you are running SharePoint on-premises, you won’t get some of the tricks I will describe below, but nevertheless, I think it is still worthwhile to read.

Tip # 1: Mimic folders with grouped views

Assuming you are already using metadata in a library, make sure to create lots of grouped views. Just like folder shows you files inside, the view shows the files under certain grouping (column). And you can now group up to 2 levels in the Document library – which is almost like having two levels of folders.

from folders to metadata

Tip # 2: Show your users the metadata breadcrumb feature

Another cool thing you can do is show your users the metadata breadcrumb feature. It works just like with folders. As you drill down the folder hierarchy, you end up with folder breadcrumb up top. This allows you to easily switch back and forth between different folders.

Well, guess what, metadata breadcrumb works the same exact way. As you filter or group certain columns, the metadata breadcrumb is built for you, allowing you to easily switch back and forth between different views as well. Isn’t it neat?

from folders to metadata

Tip # 3: Show your users drag and drop metadata change

Just like the previous trick – this is only available in the new document library experience. The # 1 complaint with metadata is that the users need to open details/properties information panel and tag the documents. Well, you can also tag by dragging and dropping a document into the relevant grouped category. Go ahead and group your documents by one of the properties. Say, for example, you need to change the status of a document from Execution to Closing. Just go ahead and drag and drop a document from one grouping to another. The document automatically gets tagged with Closing phase metadata! How cool is that?

As you drag and drop documents from one metadata grouping to another, they are automatically retagged! This is amazing!

Tip # 4: Educate them about Quick Edit Feature

Another common complaint is that it takes a lot of time to tag documents. This is not an issue at all and is more of lack of education and training. Quick Edit features in SharePoint lists and libraries allows tagging of multiple documents at once, in a matter of few seconds. I documented that trick in this post.

Tip # 5: Continue with education and training

Of course, those tricks alone won’t convince those hardcore folder fans that metadata is the thing. But at least this is a step in the right direction. So make sure to continue the dialog via proper education and training.

The post How to smoothly transition your users from folders to metadata appeared first on SharePoint Maven.

Do you really need to check out a document in SharePoint?

$
0
0

In an earlier post, I explained the concept of Co-authoring in SharePoint. Co-authoring allows multiple users to work on the same document simultaneously. The concept of check-in/check-out is a total opposite of co-authoring. In this article, I would like to explain what it is all about and whether you need it at all.

Co-authoring is all about collaboration between multiple users. Check-in/Check-out, on another hand, is a total opposite of co-authoring. Check-in/Check-out is for control freaks like me, who want to control the document they are working on without anyone else messing it up. Essentially, check-out prevents other users from making any changes to the document until you check the document back in.

How to check out a document?

There are 3 ways for you to check out a document:

  1. Manual check-out
  2. Automatic check-out
  3. Missing required column check-out

Manual Check-out

To manually check out a document, right-click on the file you want to check out, and choose More > Check-out

check out a document in SharePoint

Automatic Check-out

Automatic check out means that users will be forced to check out a document from a document library before they can make any edits. To enable automatic check out, go to Library Settings > Versioning Settings and switch  Require documents to be checked out before they can be edited? to Yes. Click OK

check out a document in SharePoint

Next time anyone tries to edit any document in the library – they will be forced to check out a document.

check out a document in SharePoint

Message users get when they try to edit (Word) document in the browser

check out a document in SharePoint

Message users get when they try to edit (Word) document using Word desktop application

Missing Required Column Check-out

This is not really an official name or anything. I call it “a very annoying type of check-out“. It happens when you make your metadata columns required and users upload the file, but exit metadata screen before metadata is filled. SharePoint, in this case, makes the document checked-out. The user then manually needs to fill in required metadata and manually check the file back in. In the meantime, the file will not be visible to anyone else, until the user who is uploading the file fills in the required metadata and checks it in. It is important to note that this type of behavior only occurs in the classic document library. The issue has been addressed with the modern document library. Modern document libraries do not require “required” metadata, so you can upload documents and leave metadata fields blank, and documents will not be checked out by default! Instead, users are able to fill in “required” metadata via a new feature called “attention view“.

check out a document in SharePoint

What happens when the document is checked out?

Once the document is checked out, there is a little green arrow that appears over the file type icon. If you hover over it with your mouse, it will tell you who the document is checked out to.

check out a document in SharePoint

What will other users experience?

When you check out a document, users will still be able to access the latest version of the document in SharePoint document library, bit only in Read mode. They will not be able to make any edits or save the document back to the library until the original document is checked back in.

How to check the document back in?

Check in your own document

Once you are done with all the changes and are ready to make the document available for others to modify, you can check it back in by choosing Check-in

If you are making changes from within Office Apps, usually it is smart enough to remind you to check in when you exit the application.

check out a document in SharePoint

Check in on behalf of others

As an Administrator, you can also take over the checked out documents and check them in on other’s behalf. Go to Library Settings, then Manage files which have no checked in version

Then, choose the files you want to take over and choose Take Ownership of Selection

This will allow you to check the file in as if this is your own file (using instructions above).

How to discard check out?

If you wish, you can also discard the check-out altogether. Just choose Discard Check Out from the menu.

Do you need check-in/check out?

Back to the original subject of this post. Do you really need to check out a document before making any changes? Here is my advice:

Try to stay away from the check-out feature unless it is absolutely necessary

For most usual types of document libraries, you do not need to check-out a document or enable automatic check-out. It adds a lot of unnecessary overhead and complexity for end users (i.e. hidden documents). If you have a highly collaborative environment, you do not need to slow the users down by making them check out the file every time they click “Edit”. Moreover, any changes that are made to the document are controlled via version history, so you can always go back and restore a previous version if need be. So to summarize, stay away from check-out, you don’t need.

The post Do you really need to check out a document in SharePoint? appeared first on SharePoint Maven.

7 reasons you cannot find the documents in a SharePoint document library

$
0
0

You know that feeling when you cannot find your car keys or wallet in your house? You know they are there, somewhere, but, yet, you spend the whole day searching for them. The same phenomenon applies to SharePoint document libraries. You have seen the document before, and now it is …gone. This post will try to shed some light on the mystery and will help uncover some common culprits of why you can no longer see and find the documents in a SharePoint document library.

Reason 1: File or folder-level security

One of the reasons you or your users might not see certain files or folders (while others can) is because those files and folders might have unique security and permissions set at file or folder level. While the best practice is to set and manage security at the site level, you can break inheritance at the document library or even file/folder level. If a certain folder has unique permissions – it (along with its contents) will not be visible to anyone else. To check whether or not you have unique permissions at the folder level, click the checkbox next to a file or folder and then click on the “i” Document Information Panel on the right-hand-side of a document library. There you can see who has access to the given file or folder.

find the documents in a SharePoint document library

After you click Change permissions, you can add/remove users.

find the documents in a SharePoint document library

Reason 2: View filtering

Another common reason for missing files could be the fact that those files are filtered out via a view. That could especially be the case if you are using metadata. Check your views to make sure the documents are not filtered out via any of the columns/metadata fields. By the way, another reason not to touch default views in SharePoint lists and libraries!

Reason 3: Required Metadata and Check-out feature

This used to be one of the biggest reasons for missing files. With the arrival of the modern new document library, this is not so much of an issue anymore, but you can still encounter it if you set up your library in the classical mode. This happens when you set some of the metadata columns to “required” in the document library and instead of uploading and tagging, you upload but do not tag. This also happens when you drag and drop multiple documents into the library with required columns. Both of these scenarios will cause the files to be checked out since required metadata fields are not complete. While the files uploaded during the initial load are checked out, they are invisible to the rest of the organization, until mandatory fields are filled in, and files are checked in. I talk more about check-in and check out in this post.

Reason 4: Content Approval feature

Another reason you might have “missing files” is because you enabled Content Approval feature. If you did, the files uploaded or being revised (with Status = Pending) are only visible to those who uploaded the files and those with permissions to Approve the files. Also, if under Versioning, you opted for draft versions, you can hide draft versions from users altogether. More on this in this post.

Reason 5: Search Indexing

Out of the box, SharePoint indexes all of the files uploaded and makes them searchable across your Intranet. When you execute a search via a Document Library Search Box or SharePoint Site Search Box (read more about it here), the files show up because they are indexed. You can turn off indexing at the library or Site level. While indexing is turned off, it won’t make the files “disappear” from the document library like in above cases, but they will not be searchable/discoverable via the search box. Here is how to check whether or not indexing is on or off:

Library Level

Document Library Settings > Advanced Settings > Search

find the documents in a SharePoint document library

Site Level

Site Settings > Search and Offline Availability (under Search) > Indexing Site Content

find the documents in a SharePoint document library

Reason 6: Moved

OK, it is quite possible someone just moved the file (or copied and deleted) to a different document library/site altogether, now that it is so easy to move files!

Since you would not know where to find the file now, I suggest you execute a global search from the top-level site of the root site collection. This will ensure that it goes after all the site collections and site you have in your environment! You can read more about how this search works here.

Reason 7: Deleted

You know what they say, “One man’s trash is another man’s treasure.” If all else fails, check the Recycle Bin. It is quite possible that the file you are looking for has been deleted and ended up in a Recycle Bin. You need to be a Site Collection Administrator to see everyone’s Recycle bin, so make sure you have proper access or ask your IT to check out the Administrative Recycle Bin or secondary-stage recycle bin. You have 90 days to restore files from the Recycle Bin.

The post 7 reasons you cannot find the documents in a SharePoint document library appeared first on SharePoint Maven.

3 ways to store images in SharePoint

$
0
0

We tend to think of SharePoint as strictly a repository for business-type/Office documents, like Word, Excel, PowerPoint, PDFs. However, even in the business world, it is not just about the office documents. More and more, visuals, like photos and videos become a necessary content in the daily business life. Previously, I blogged about various options to store videos. Today, I want to explain the different options for storing pictures, photos and different types of images in general.

Option 1: Modern Document Library

Yes, this was no typo. The old document library did not have anything special to accommodate photos, and they were stored just like any other documents in a list format, which was boring:
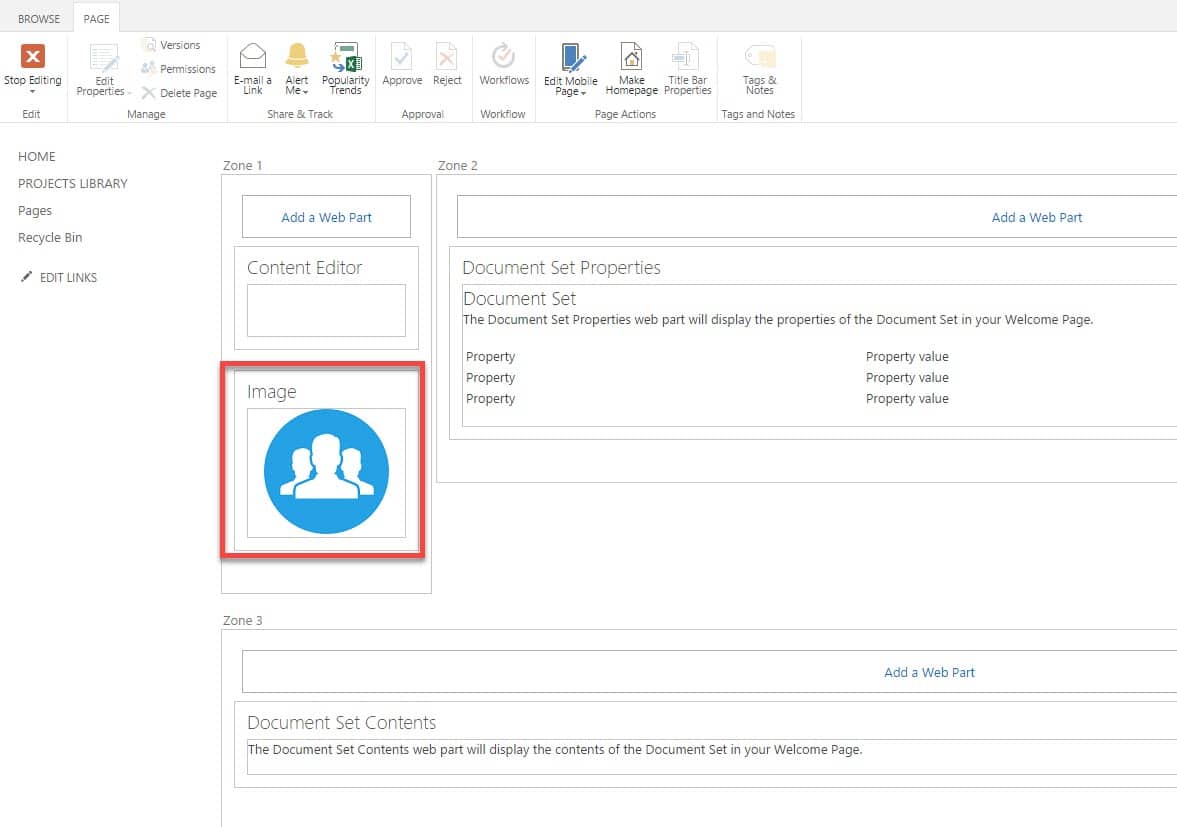
The new modern document library allows for awesome photo viewing capabilities. Built-in Tiles View allows viewing thumbnails of images right within a document library, without a need to click on each image!

store images in SharePoint

Tiles View

Image thumbnails once you click on a Tiles View

Option 2: Picture Library

Picture library is a separate web part that is available in SharePoint to store images.

store images in SharePoint

Up until the modern library experience, it has been the dedicated place to store images, as it allowed for some of the picture-specific functionalities, like thumbnail preview. Now that the modern document library has those features, a separate picture library is almost not necessary.
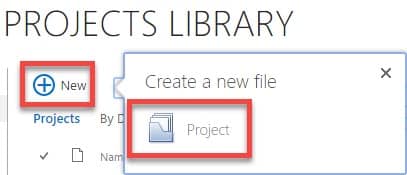
That said, a Picture Library, unlike a Document Library, does have some superior image-specific functionalities that might tip the scale in its favor:
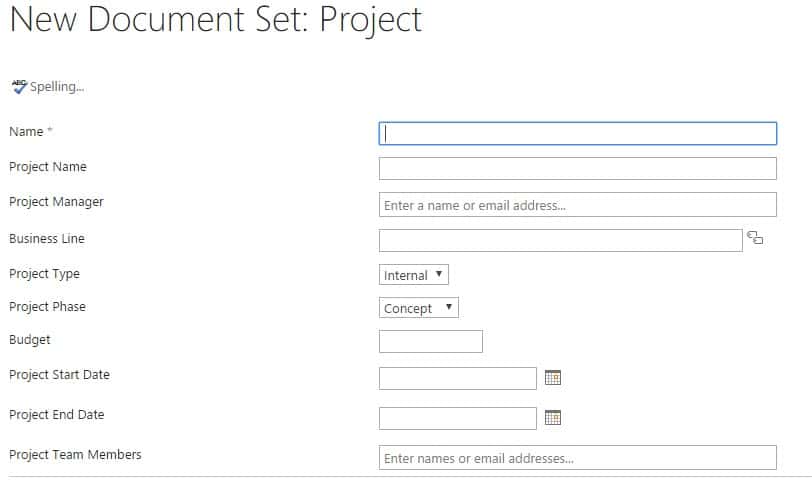
  1. It defaults to Tiles/Thumbnails view by default, unlike Document Library, which defaults to a list view
  2. It contains some default, image-specific metadata you can use like Date Picture was taken or Enterprise Keywords for metadata taggingstore images in SharePoint
  3. Another benefit of a picture library is that you can tie it to a Slideshow web part and display photos from the picture library in a slideshow on a page. I listed step-by-step instructions on how to do this here.

Option 3: Insert on a Page

Any time you insert an image or images on a classical or modern page, Images end up being stored in a Site Assets Library.

When you insert images via Modern Page…

… or Classical Page

store images in SharePoint

They all end up in a Site Assets Document Library.

These images are stored in Site Assets Library once uploaded to a Page

Recommendation

I suggest that you stick to the Modern Document Library to store pictures. Unless you need that metadata I mentioned above or need to create a slideshow, using a document library would make the most sense.  Quite often, you need to store images alongside other documents, so having a separate library would not make sense. For example, one of my clients, they are in Real Estate, so they have different office type documents, alongside property/property maintenance images. They all store them in one library with a subfolder for photos. Makes total sense!

The post 3 ways to store images in SharePoint appeared first on SharePoint Maven.

Why you should never attach documents in a SharePoint list

$
0
0

I see this happening again and again – users attach documents in a SharePoint list. Yes, you can do it – but that is not what SharePoint list was designed for. It is like making pancakes with an iron. As a matter of fact – there are some very strong reasons for you not to continue this poor business practice. Let me explain.

Just to set the stage for what I am talking about, in SharePoint, there is a concept of a list and a library. In case you require clarification on the difference between the two, check out this post.

SharePoint Document Library, by default, allows to store and organize, you guessed it, documents (files). If you have a document to store – you would just upload one (or many) into a document library. And of course, you can organize them via folders or metadata.

SharePoint List, on another hand, is used for storing non-document information (think of it as Excel in SharePoint) – table of rows and columns of some information). This could be a list of events, properties, clients, projects, tasks, etc.

The thing is that SharePoint lists also allow you to attach documents (files) to a given list item. Say you have a list of projects or clients in a SharePoint list, you can attach the file(s) to a given item.attach documents in a SharePoint list

Attachment option in a “classical” SharePoint List

attach documents in a SharePoint list

Attachment option in a “modern” SharePoint List

Eventually, you can also end up with an item that has multiple attachments associated with it.

attach documents in a SharePoint list

Now that we are clear on the difference and the mechanism of the two, let me explain why you should not use SharePoint lists to store attachments.

Reason 1: Lack of Document Management features

By default, SharePoint list is not a document library and, as a result, lacks all the document management features of a document library, like versioning, check-in/check-out, co-authoring, ability to open and edit documents in the browser, etc.

Reason 2: Lack of Version History on the attached files

While you do have a version history functionality on the item in the list itself (if you enable versioning on the list), it does not carry over to the attached files. For example, if you have an item at Version 1 with two attachments, then make a change to an item and delete one of the attachments, if you decide to go back (restore) Version 1 again, it will only have 1 attachment, not the 2 it had originally. You would need to remember to go to the Recycle Bin and restore deleted attachments from there!

Reason 3: No way to organize attachments or apply document specific metadata

Since attachments just sit together attached to an item, there is no way to organize them in folders or apply file-specific metadata (like you can in the document library). I hope this is obvious!

attach documents in a SharePoint list

Reason 4: Can’t upload multiple attachments at once (classical list only)

This depends on whether you use classical SharePoint list or a modern one. In classical SharePoint custom lists and other “classical” web parts like Calendar, Tasks, Issues, Announcements, etc, you can only attach one file at a time. With the modern SharePoint lists (think Custom List), this is not an issue, you can upload many at once, no problem.

attach documents in a SharePoint list

How can I prevent people from uploading attachments to a SharePoint list?

Option 1: Training

Education, my friend, education. Knowledge is power! While you can turn off attachments on a list (like I describe below), you won’t remember to do it on every single list you have in your environment. So make sure to properly educate your users (share this post with them) and educate and train them before they screw it up for you!

Option 2: Turn off attachments in a list

It is very easy to disable attachments on a SharePoint list. And something I do every time I configure a list for my clients. To disable attachments in a list:

  1. Go to List Settings > Advanced Settings
  2. Scroll to the middle of the page to Attachments section and choose Disabled radio button
  3. Click OK

Should I never use SharePoint lists for storing documents?

Just like with any other situation in life, it depends. In most cases, it would be wise to not use SharePoint lists for storing files and working documents. However, there are certain situations where this might be beneficial. Say, for example, you have built a Help Desk system in SharePoint, and it is, of course, a SharePoint list (say, Issues log). So when users submit a ticket, you might want them to also attach screenshots to help IT solve the helpdesk request. So leave attachments on in that case.

However, anytime you need to store MS Office documents or other files for say a client or a project, and especially when you wish to store multiple documents, you are better off using good old SharePoint document libraries.

What if I need to store both the list information and documents, what do I do?

Use Document Sets!

In case you have one-to-many sort of relationship, where, say, you have a client list and some documents that need to be associated with a client, the option I would highly recommend is Document Set.

Document Set functionality allows you to create folder level metadata (your SharePoint list metadata essentially) and attach files to each document set (i.e., Client). In a way, you end up with a folder (document set) for each client or project and then corresponding documents inside of each folder. On top of that, all files stored within a document set inherit metadata from the folder! So it is almost like having a SharePoint List with attachments, except, done properly!

List of folders (document sets) with metadata (in place of a SharePoint List metadata)

Contents of a Document Set. Files are organized using metadata and benefit from all the available document management capabilities

If you want to familiarize yourself with the magic of document setscheck out this post which explains what they are all about and how to set them up.

The post Why you should never attach documents in a SharePoint list appeared first on SharePoint Maven.

Viewing all 70 articles
Browse latest View live